15、SpringBoot 启动过程
15、SpringBoot 启动过程
最好的学习方式就是带着问题学习,在分析 SpringBoot 的启动过程前,先问大家两个问题:
1、 在启动过程中,SpringBoot 是在哪一步实例化 Bean 的?;
答案: 在 SpringApplicatio 的 refresh() 方法刷新上下文的时候实例化的,对应本文的第 16 节。 2、 ApplicationContext 作为一个 IOC 容器,底层是通过什么方式来存储实例化好的 Bean 呢?;
答案: ApplicationContext 是先使用 Set 集合将 BeanDefinition 存储起来,然后再将不是抽象的、单例的、非懒加载的类进行实例化,然后存放到 Map 集合中统一管理。
文章中使用的源码版本:
- spring-boot: 2.2.x
- spring-framework: 5.2.x
话不多说,下面就让我们开始了解 SpringBoot 的启动过程吧。
一、过程简介
首先,SpringBoot 启动的时候,会构造一个 SpringApplication 的实例,构造时会进行初始化的工作。初始化的时候会做以下几件事情:
1、 把参数sources设置到SpringApplication属性中,这个sources可以是任何类型的参数;
2、 判断是否是 web 程序,并设置到webEnvironment的boolean属性中;
3、 创建并初始化ApplicationInitializer,设置到initializers属性中;
4、 创建并初始化ApplicationListener,设置到listeners属性中;
5、 初始化主类mainApplicationClass;
其次,SpringApplication 构造完成之后调用 run 方法,启动 SpringApplication。run 方法执行的时候会做以下几件事:
1、 构造一个StopWatch计时器,用来记录 SpringBoot 的启动时间;
2、 初始化监听器,获取SpringApplicationRunListeners并启动监听,用于监听 run 方法的执行;
3、 创建并初始化ApplicationArguments,获取 run 方法传递的 args 参数;
4、 创建并初始化ConfigurableEnvironment(环境配置)封装main方法的参数,初始化参数,写入到Environment中,发布ApplicationEnvironmentPreparedEvent(环境事件),做一些绑定后返回Environment;
5、 打印banner和版本;
6、 构造 Spring 容器(ApplicationContext)上下文先填充Environment环境和设置的参数,如果application有设置beanNameGenerator(bean)、resourceLoader(加载器)就将其注入到上下文中,调用初始化的切面,发布ApplicationContextInitializedEvent(上下文初始化)时间;
7、 SpringApplicationRunListeners发布finish事件;
8、 StopWatch计时器停止计时,日志打印总共启动的时间;
9、 发布 SpringBoot 程序已启动事件(started());
10、 调用ApplicationRunner和CommandLineRunner;
11、 最后发布就绪事件ApplicationReadyEvent,标志着 SpringBoot 可以处理接收的请求了(running());
二、过程流程图
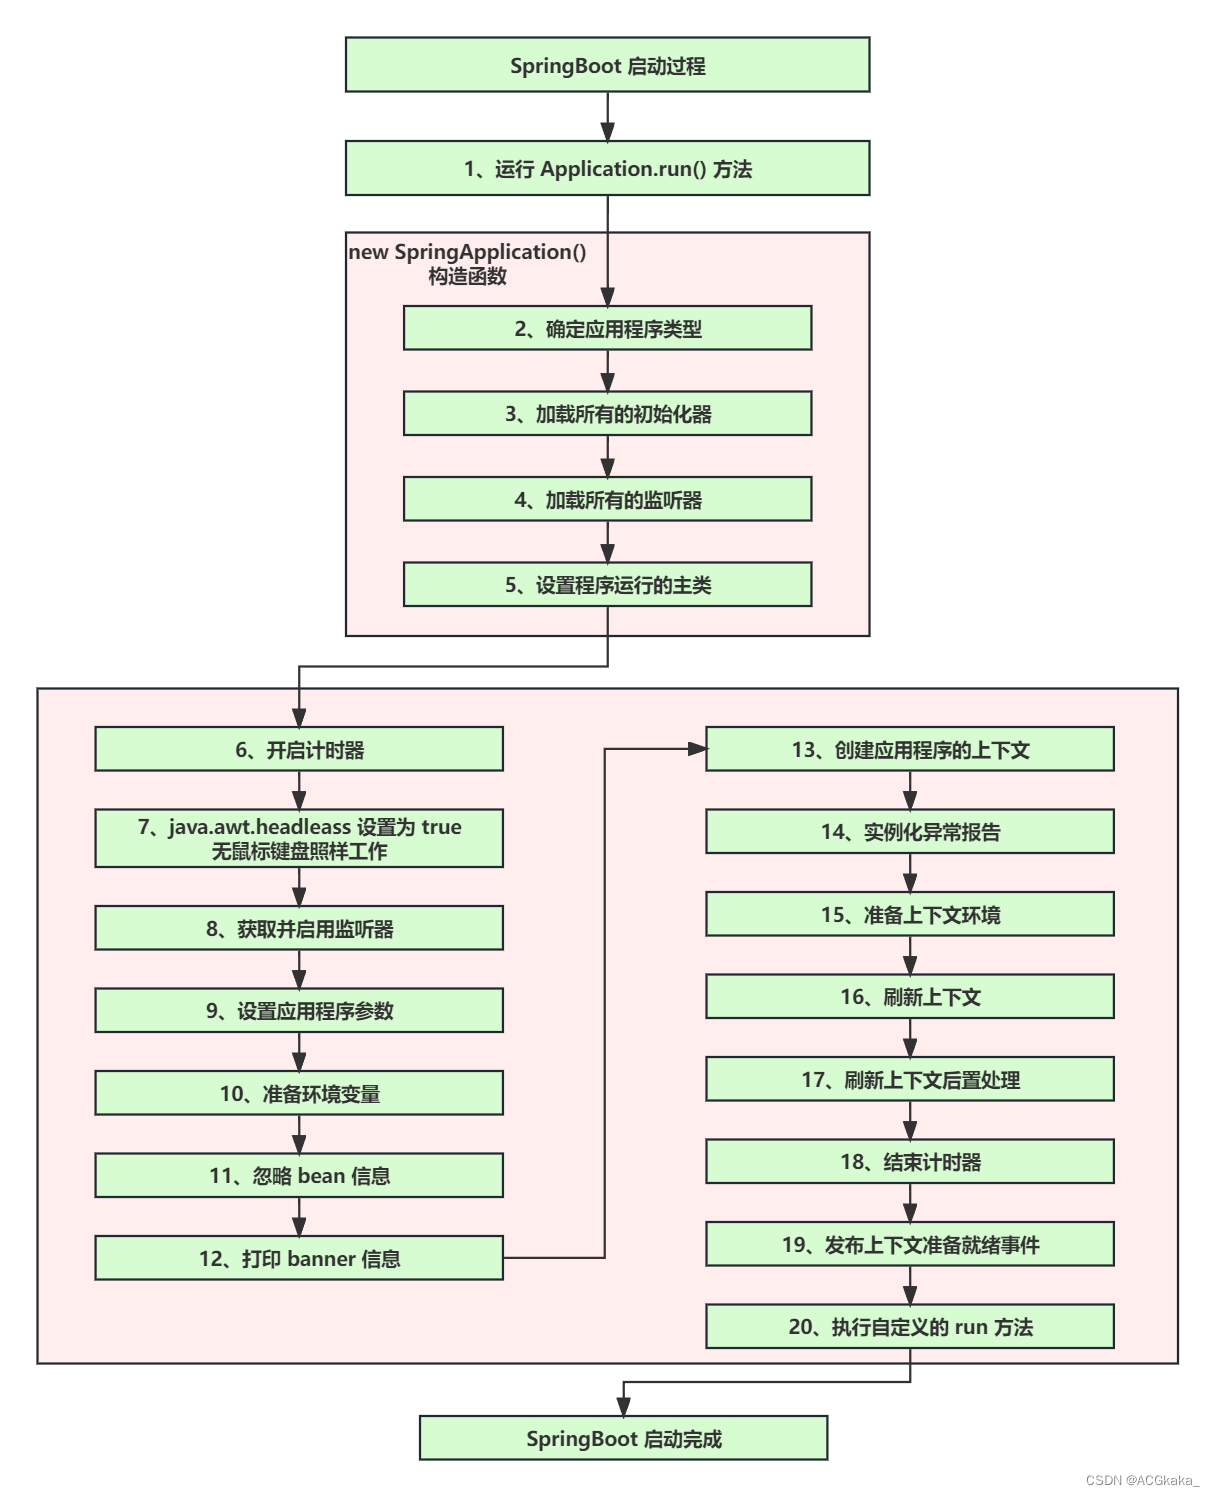
由此看来,SpringBoot 的启动过程还是挺多的,下面我们结合源码,详细分析讲解启动过程中的步骤。
三、源码分析(1)启动
1、运行 SpringApplication.run() 方法
可以肯定的是,所有的标准 SpringBoot 应用都是从 run 方法开始的。
import org.springframework.boot.SpringApplication;
import org.springframework.boot.autoconfigure.SpringBootApplication;

@SpringBootApplication
public class SpringbootDemoApplication {


    public static void main(String[] args) {


        // 启动应用
        SpringApplication.run(SpringbootDemoApplication.class, args);
    }

}
进入 run 方法后,会 new 一个 SpringApplication 上下文对象,创建这个对象的构造方法做了一些准备工作,第 2 ~ 5 步就是构造函数里面做的事情。
/**
 * Static helper that can be used to run a {@link SpringApplication} from the
 * specified source using default settings.
 * @param primarySource the primary source to load
 * @param args the application arguments (usually passed from a Java main method)
 * @return the running {@link ApplicationContext}
 */
public static ConfigurableApplicationContext run(Class<?> primarySource, String... args) {


   return run(new Class<?>[] {

      primarySource }, args);
}
另外补充一下,SpringBoot 除了 SpringApplication.run() 方法启动之外,还可以通过 AnnotationConfigApplicationContext 指定配置类启动,这里就不展开说明了。
四、源码分析(2)SpringApplication 构造函数
SpringApplication 构造函数:
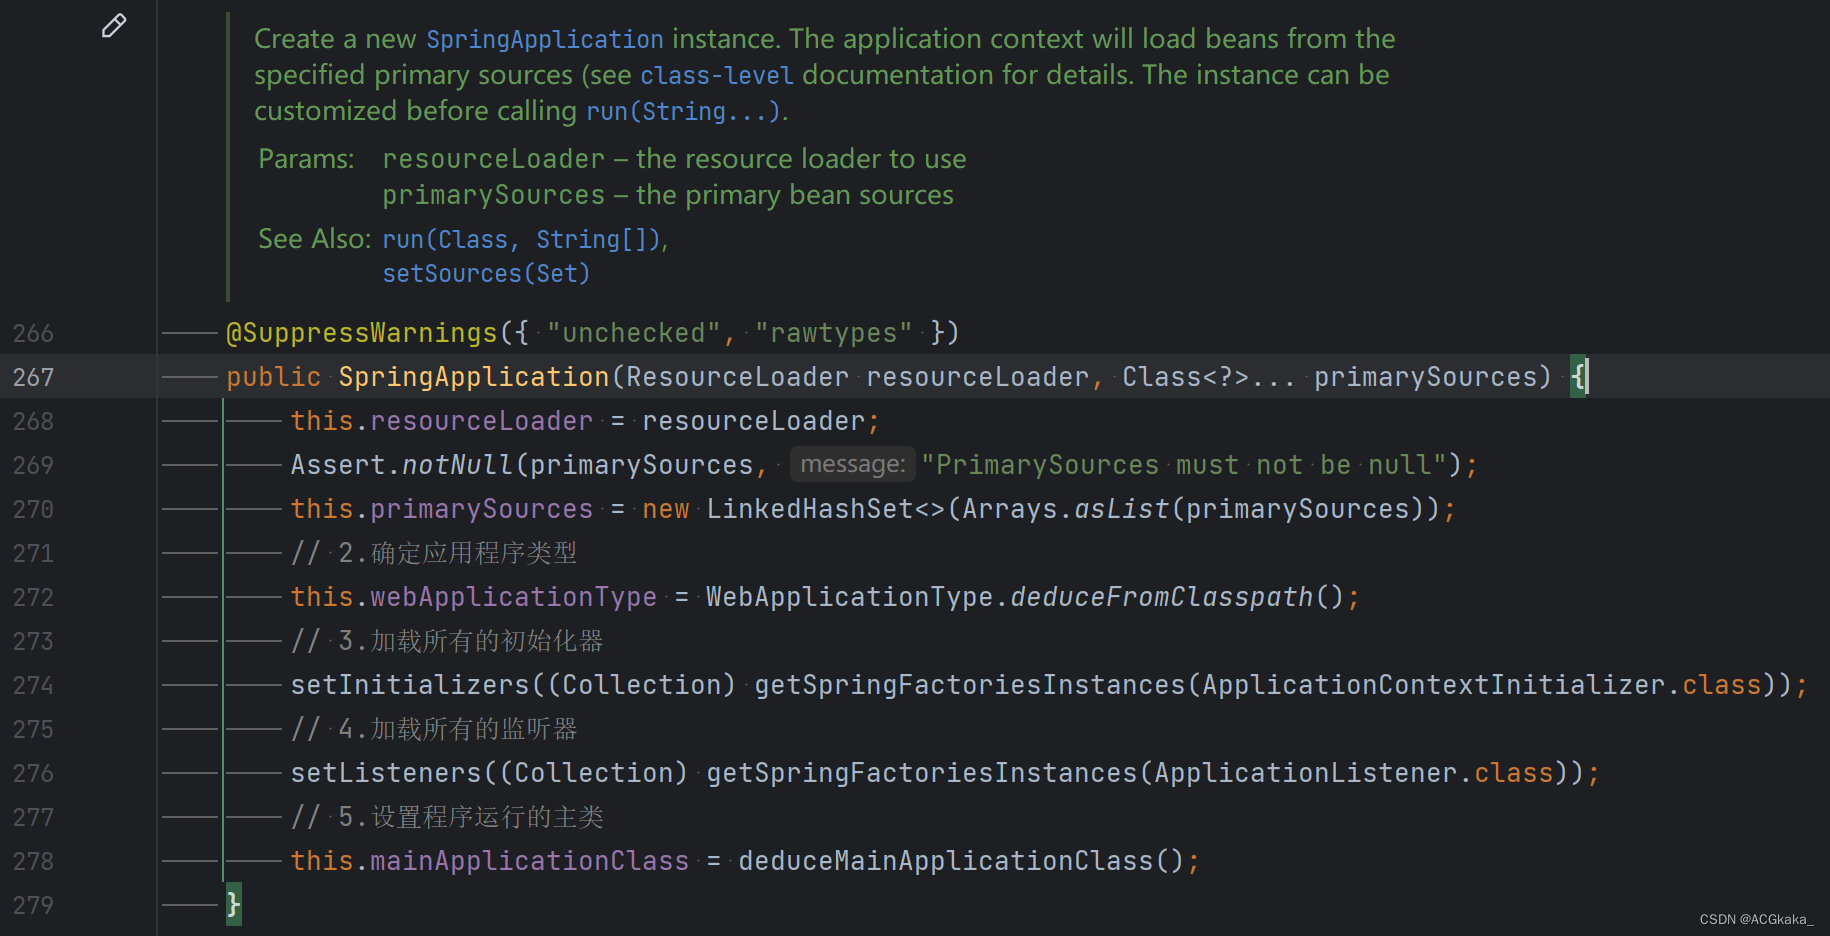
2、确定应用程序类型
在 SpringApplication 的构造方法内,首先会通过 WebApplicationType.deduceFromClasspath(); 方法判断当前应用程序的容器,默认使用的是 Servlet 容器,除了 Servlet 之外,还有 NONE 和 REACTIVE(响应式编程)。
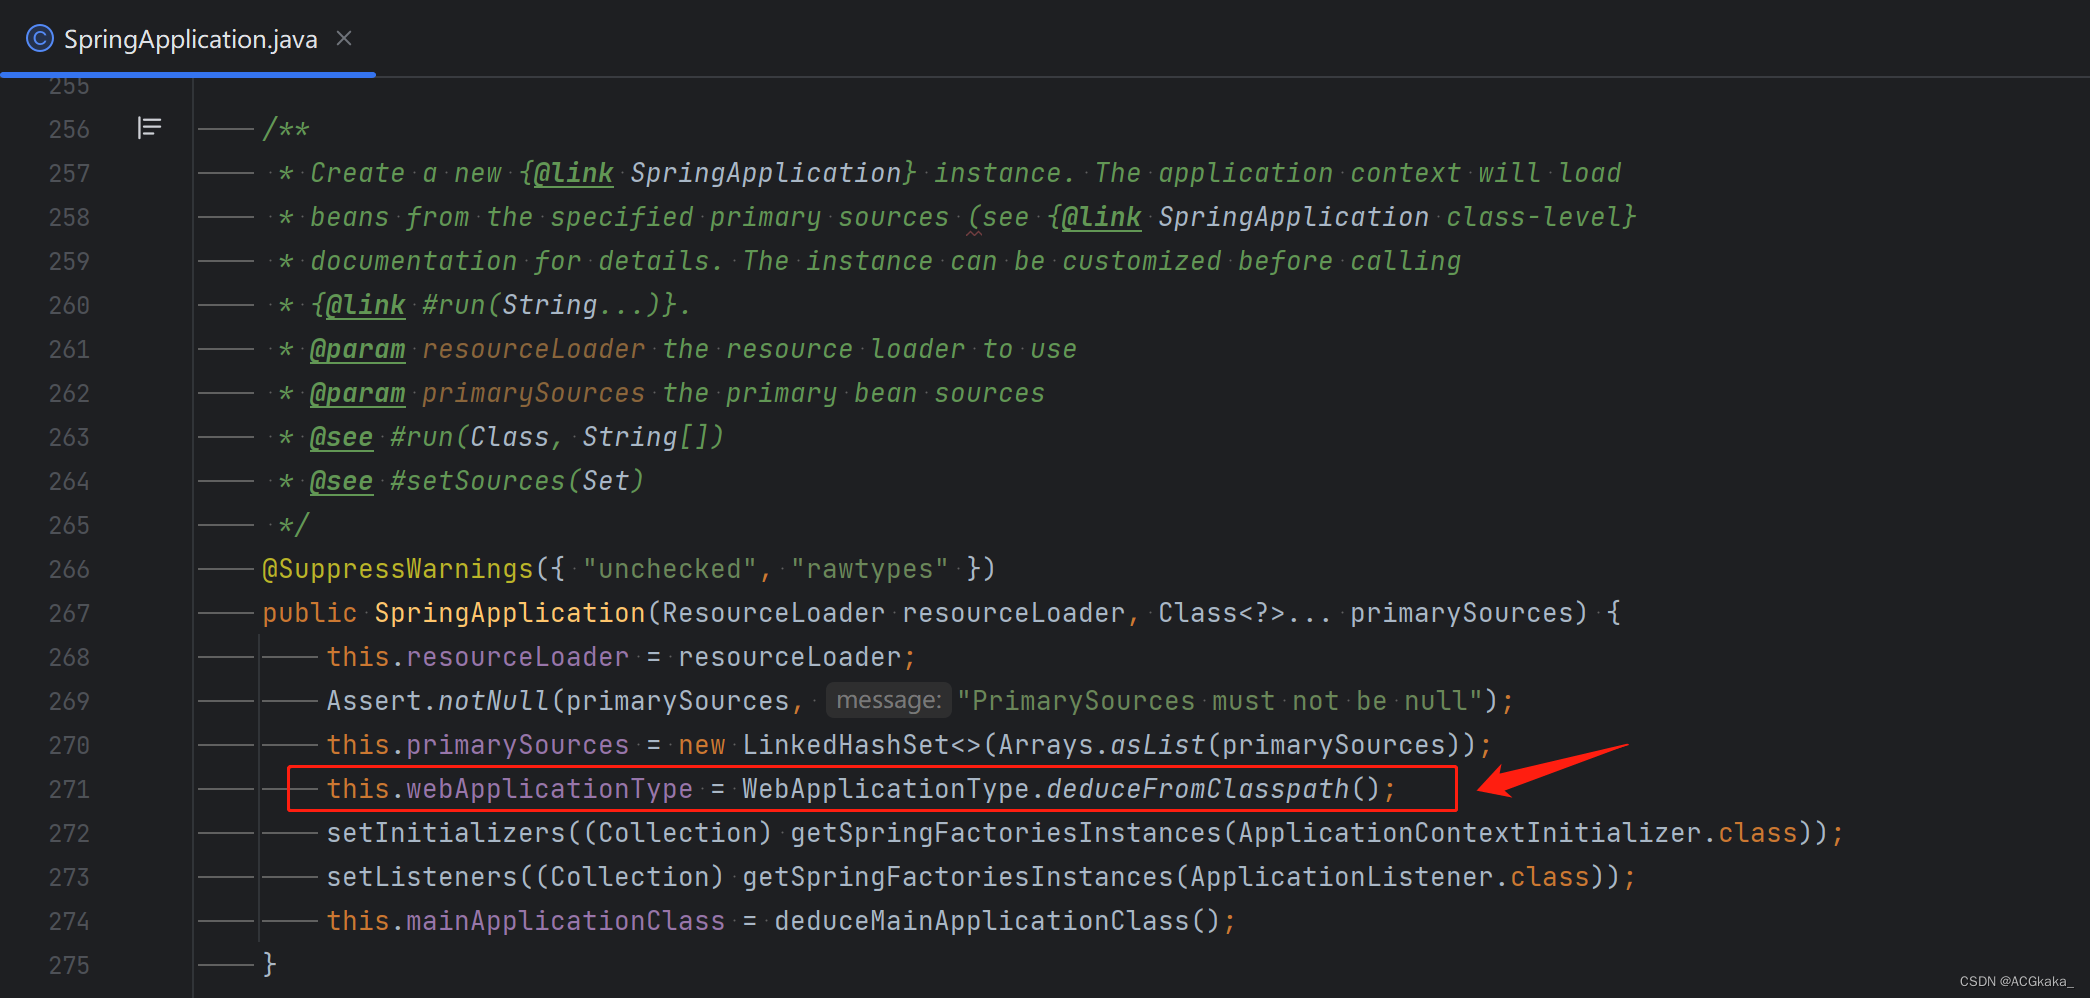
/**
 * Create a new {@link SpringApplication} instance. The application context will load
 * beans from the specified primary sources (see {@link SpringApplication class-level}
 * documentation for details. The instance can be customized before calling
 * {@link #run(String...)}.
 * @param resourceLoader the resource loader to use
 * @param primarySources the primary bean sources
 * @see #run(Class, String[])
 * @see #setSources(Set)
 */
@SuppressWarnings({

      "unchecked", "rawtypes" })
public SpringApplication(ResourceLoader resourceLoader, Class<?>... primarySources) {


   this.resourceLoader = resourceLoader;
   Assert.notNull(primarySources, "PrimarySources must not be null");
   this.primarySources = new LinkedHashSet<>(Arrays.asList(primarySources));
   this.webApplicationType = WebApplicationType.deduceFromClasspath();
   setInitializers((Collection) getSpringFactoriesInstances(ApplicationContextInitializer.class));
   setListeners((Collection) getSpringFactoriesInstances(ApplicationListener.class));
   this.mainApplicationClass = deduceMainApplicationClass();
}
3、加载所有的初始化器
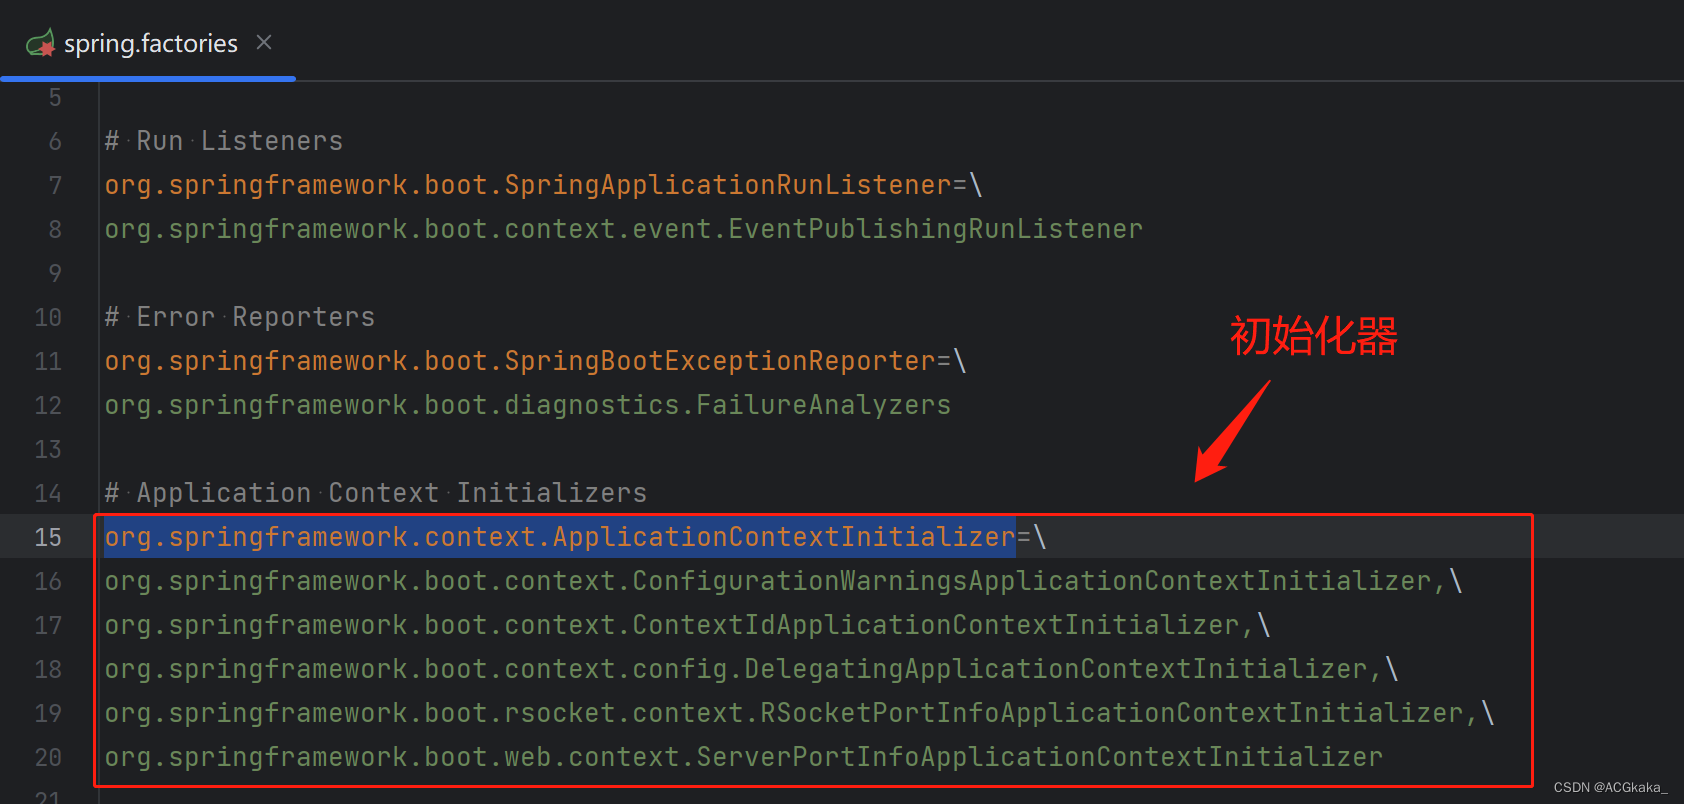
这里加载的初始化器是 SpringBoot 自带的初始化器,从 META-INFO/spring.factories 配置文件中加载的,那么这个文件在哪呢?自带的有 2 个,分别在源码的 jar 包的 spring-boot-autoconfigure 项目和 spring-boot 项目里面各有一个:
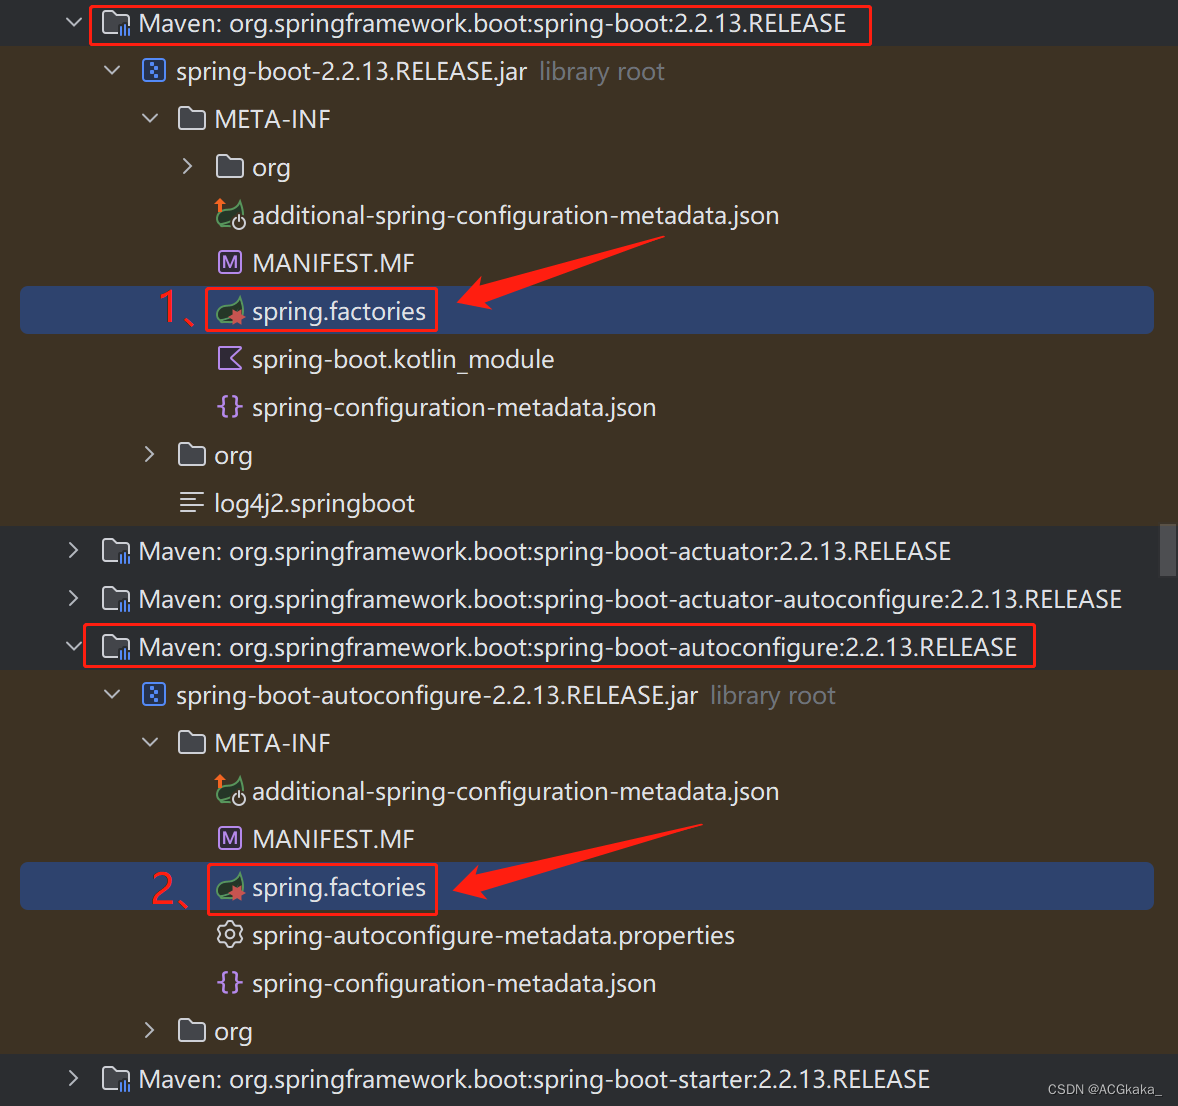
spring.factories 文件里面,可以看到开头是 org.springframework.context.ApplicationContextInitializer 接口就是初始化器了:
当然,我们也可以自己实现一个自定义的初始化器,实现 ApplicationContextInitializer 接口即可,如下所示:
MyApplicationContextInitializer.java
import org.springframework.context.ApplicationContextInitializer;
import org.springframework.context.ConfigurableApplicationContext;

/**
 * 自定义初始化器
 */
public class MyApplicationContextInitializer implements ApplicationContextInitializer {


    @Override
    public void initialize(ConfigurableApplicationContext applicationContext) {


        System.out.println("MyApplicationContextInitializer.initialize()");
    }
}
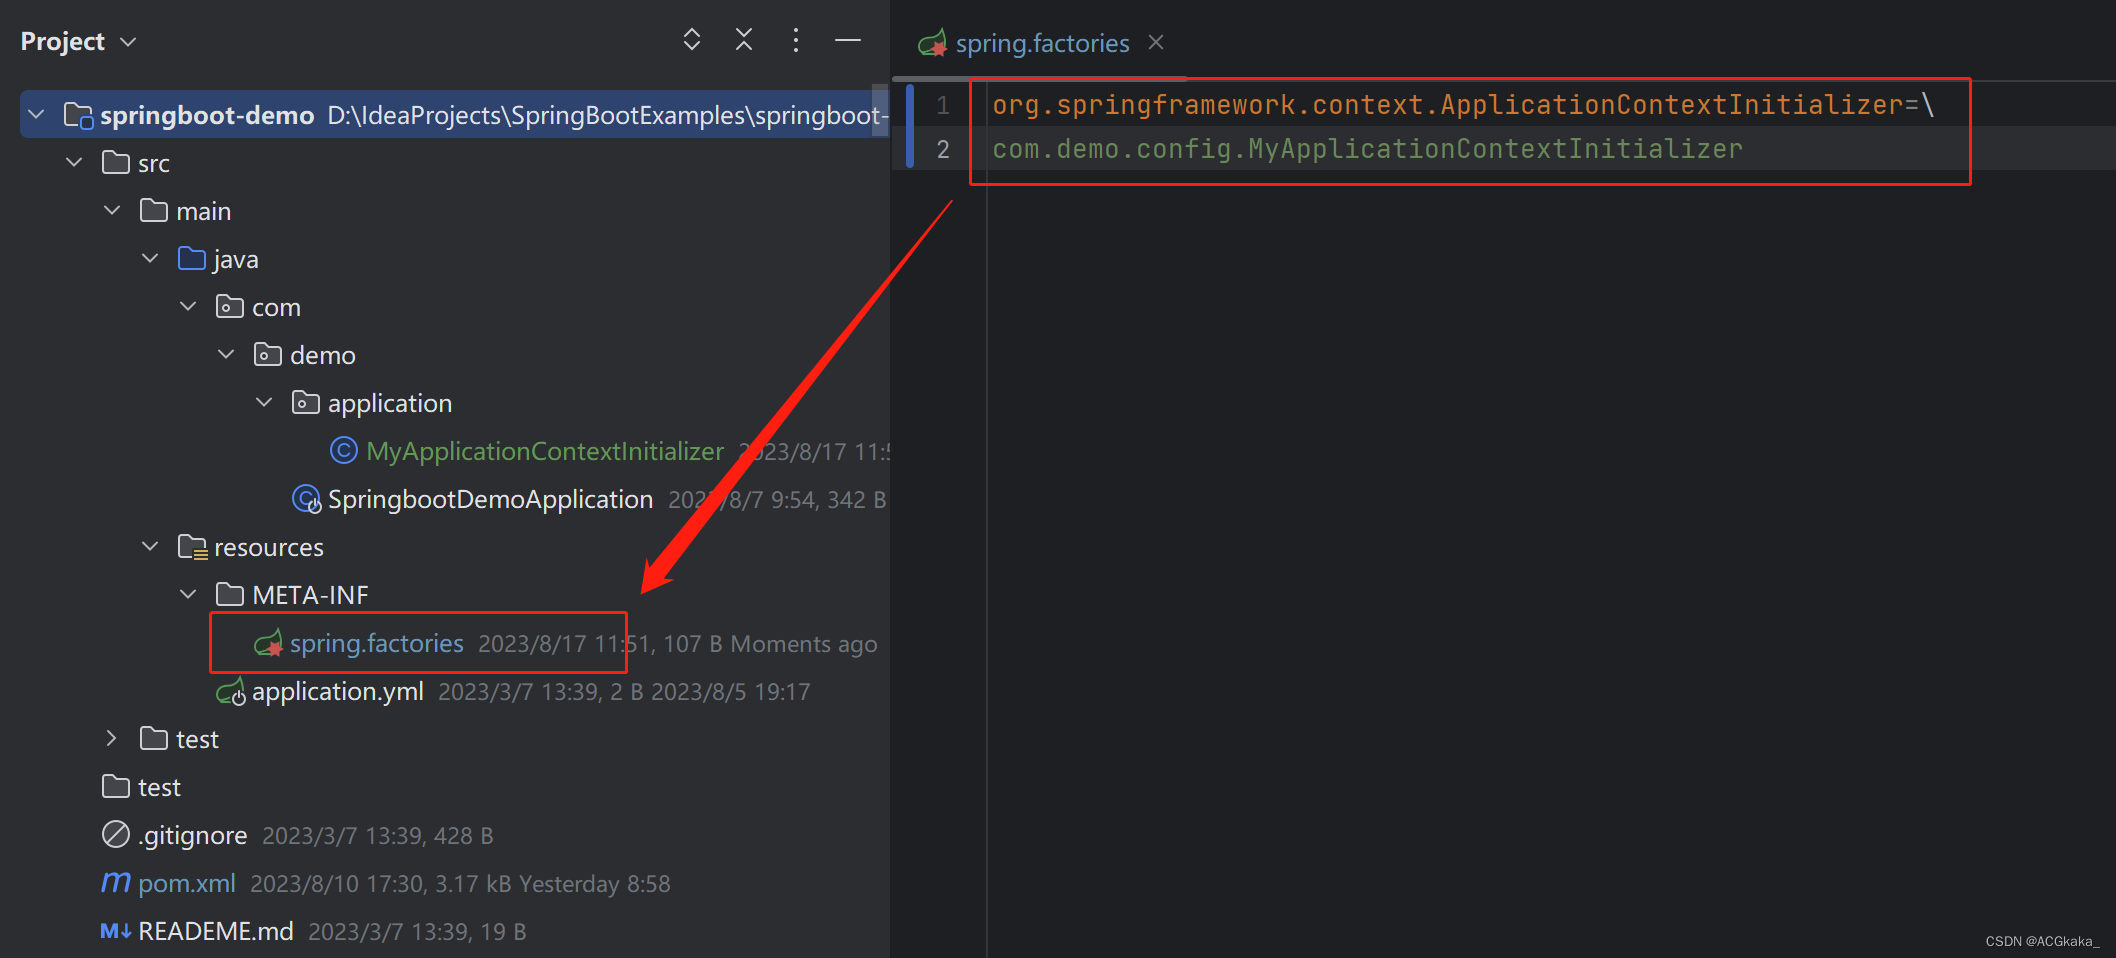
在 resources 目录下添加 META-INF/spring.factories 配置文件,目录如下,将自定义的初始化器注册进去:
org.springframework.context.ApplicationContextInitializer=\
com.demo.application.MyApplicationContextInitializer
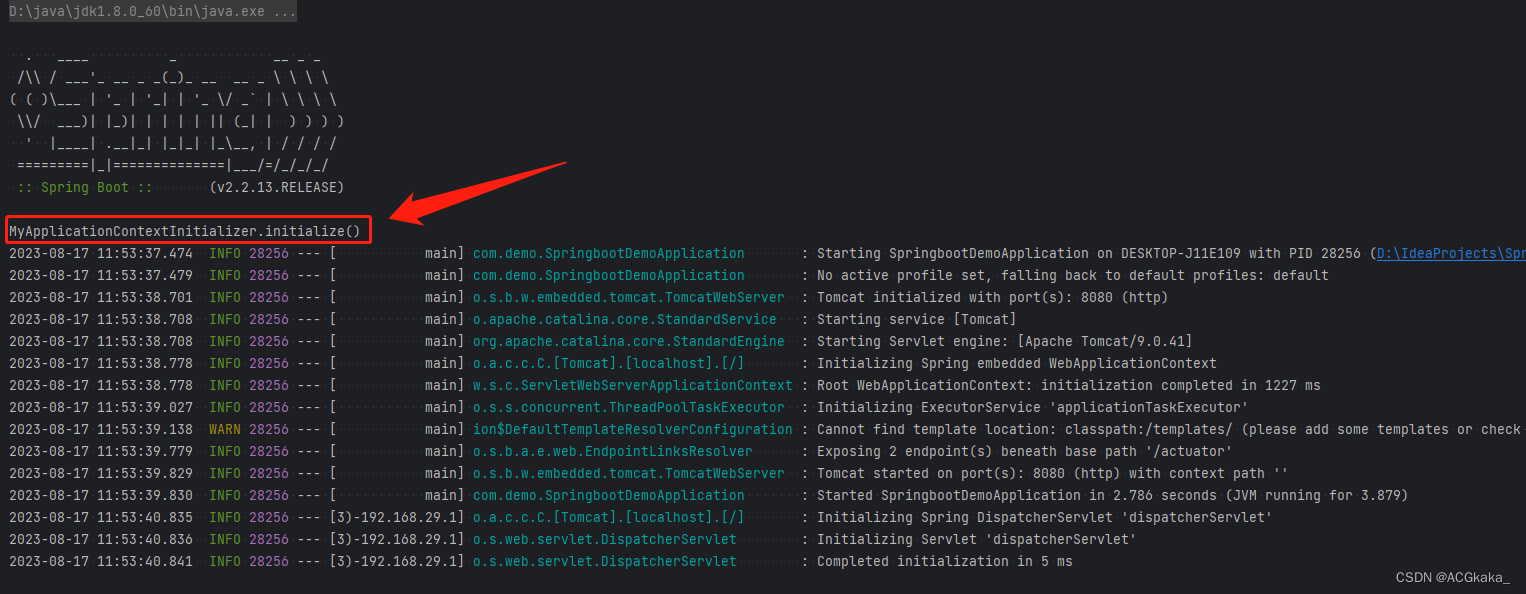
启动 SpringBoot 后,就可以看到控制台打印的内容了,在这里我们可以很直观地看到它地执行顺序,是在打印 banner 的后面执行的:
4、加载所有的监听器
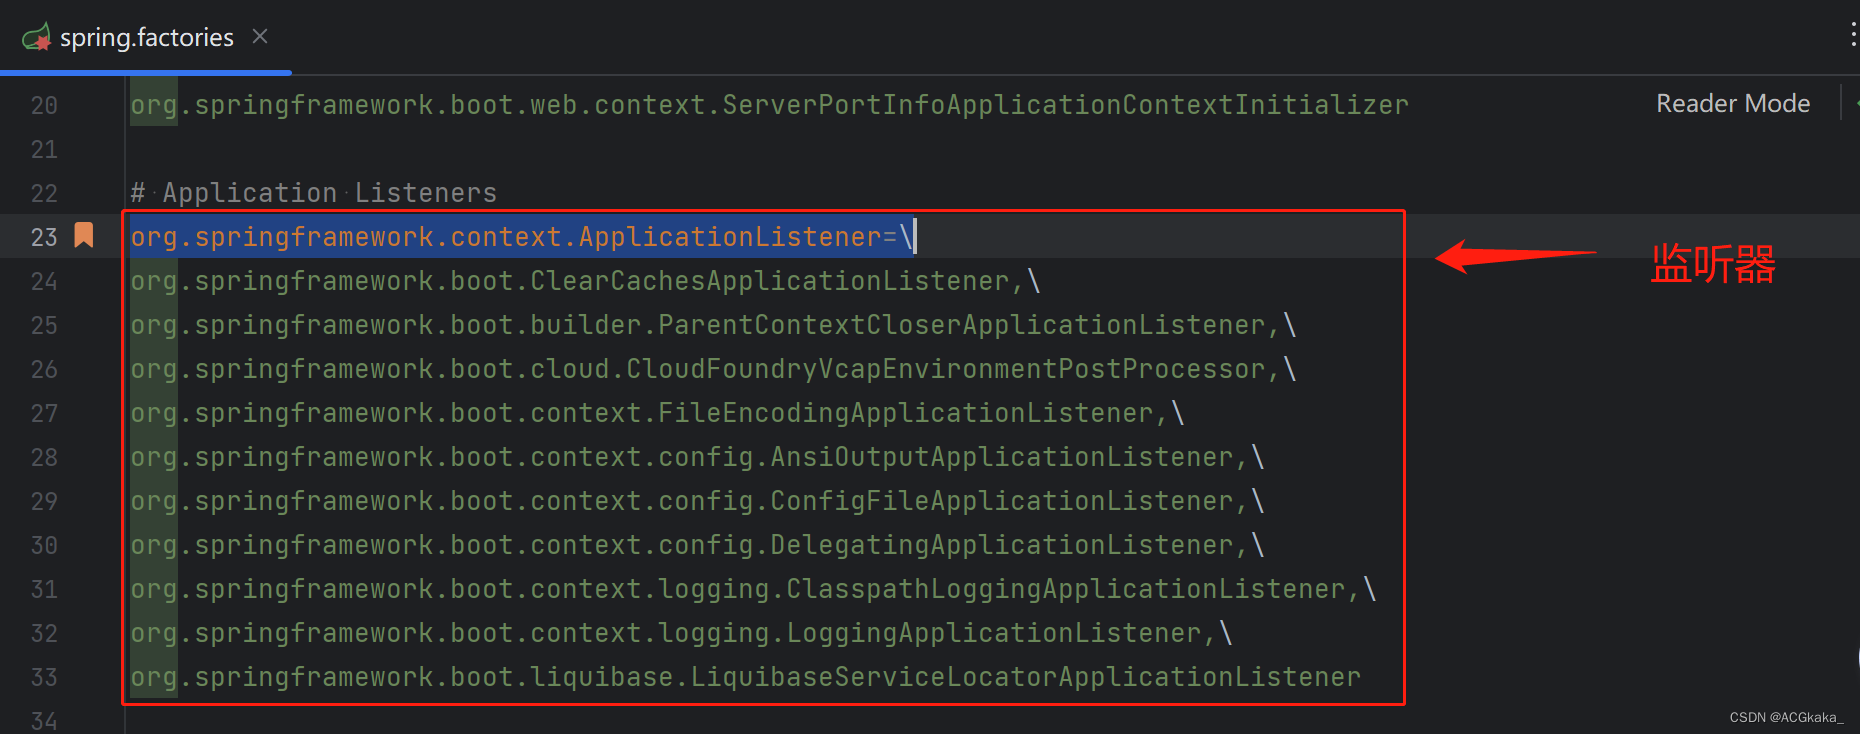
加载监听器也是从 META-INF/spring.factories 配置文件中加载的,与初始化不同的是,监听器的加载是为了实现 ApplicationListener 接口的类。
自定义监听器也跟自定义初始化器一样,这里不再举例。
5、设置程序运行的主类
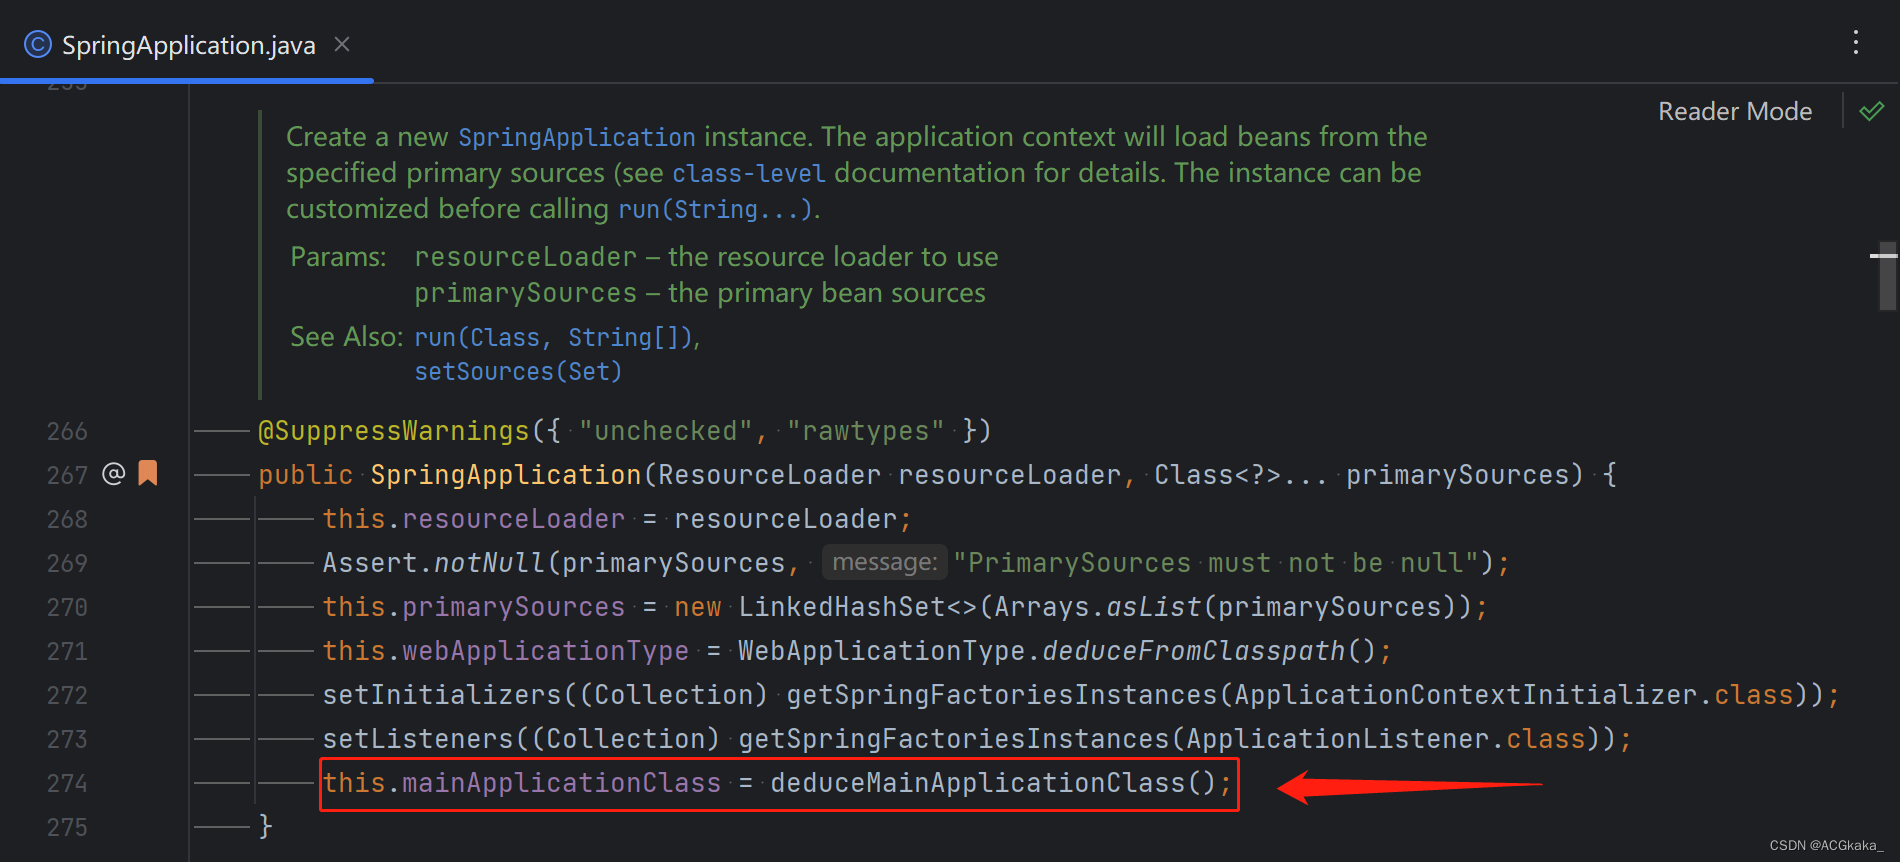
deduceMainApplicationClass(); 这个方法仅仅是找到 main 方法所在的类,为后面的扫包做准备,deduce 是推断的意思,所以准确的说,这个方法作用是推断出主方法所在的类。
五、源码分析(3)SpringApplication.run() 方法
SpringApplication.run() 方法:
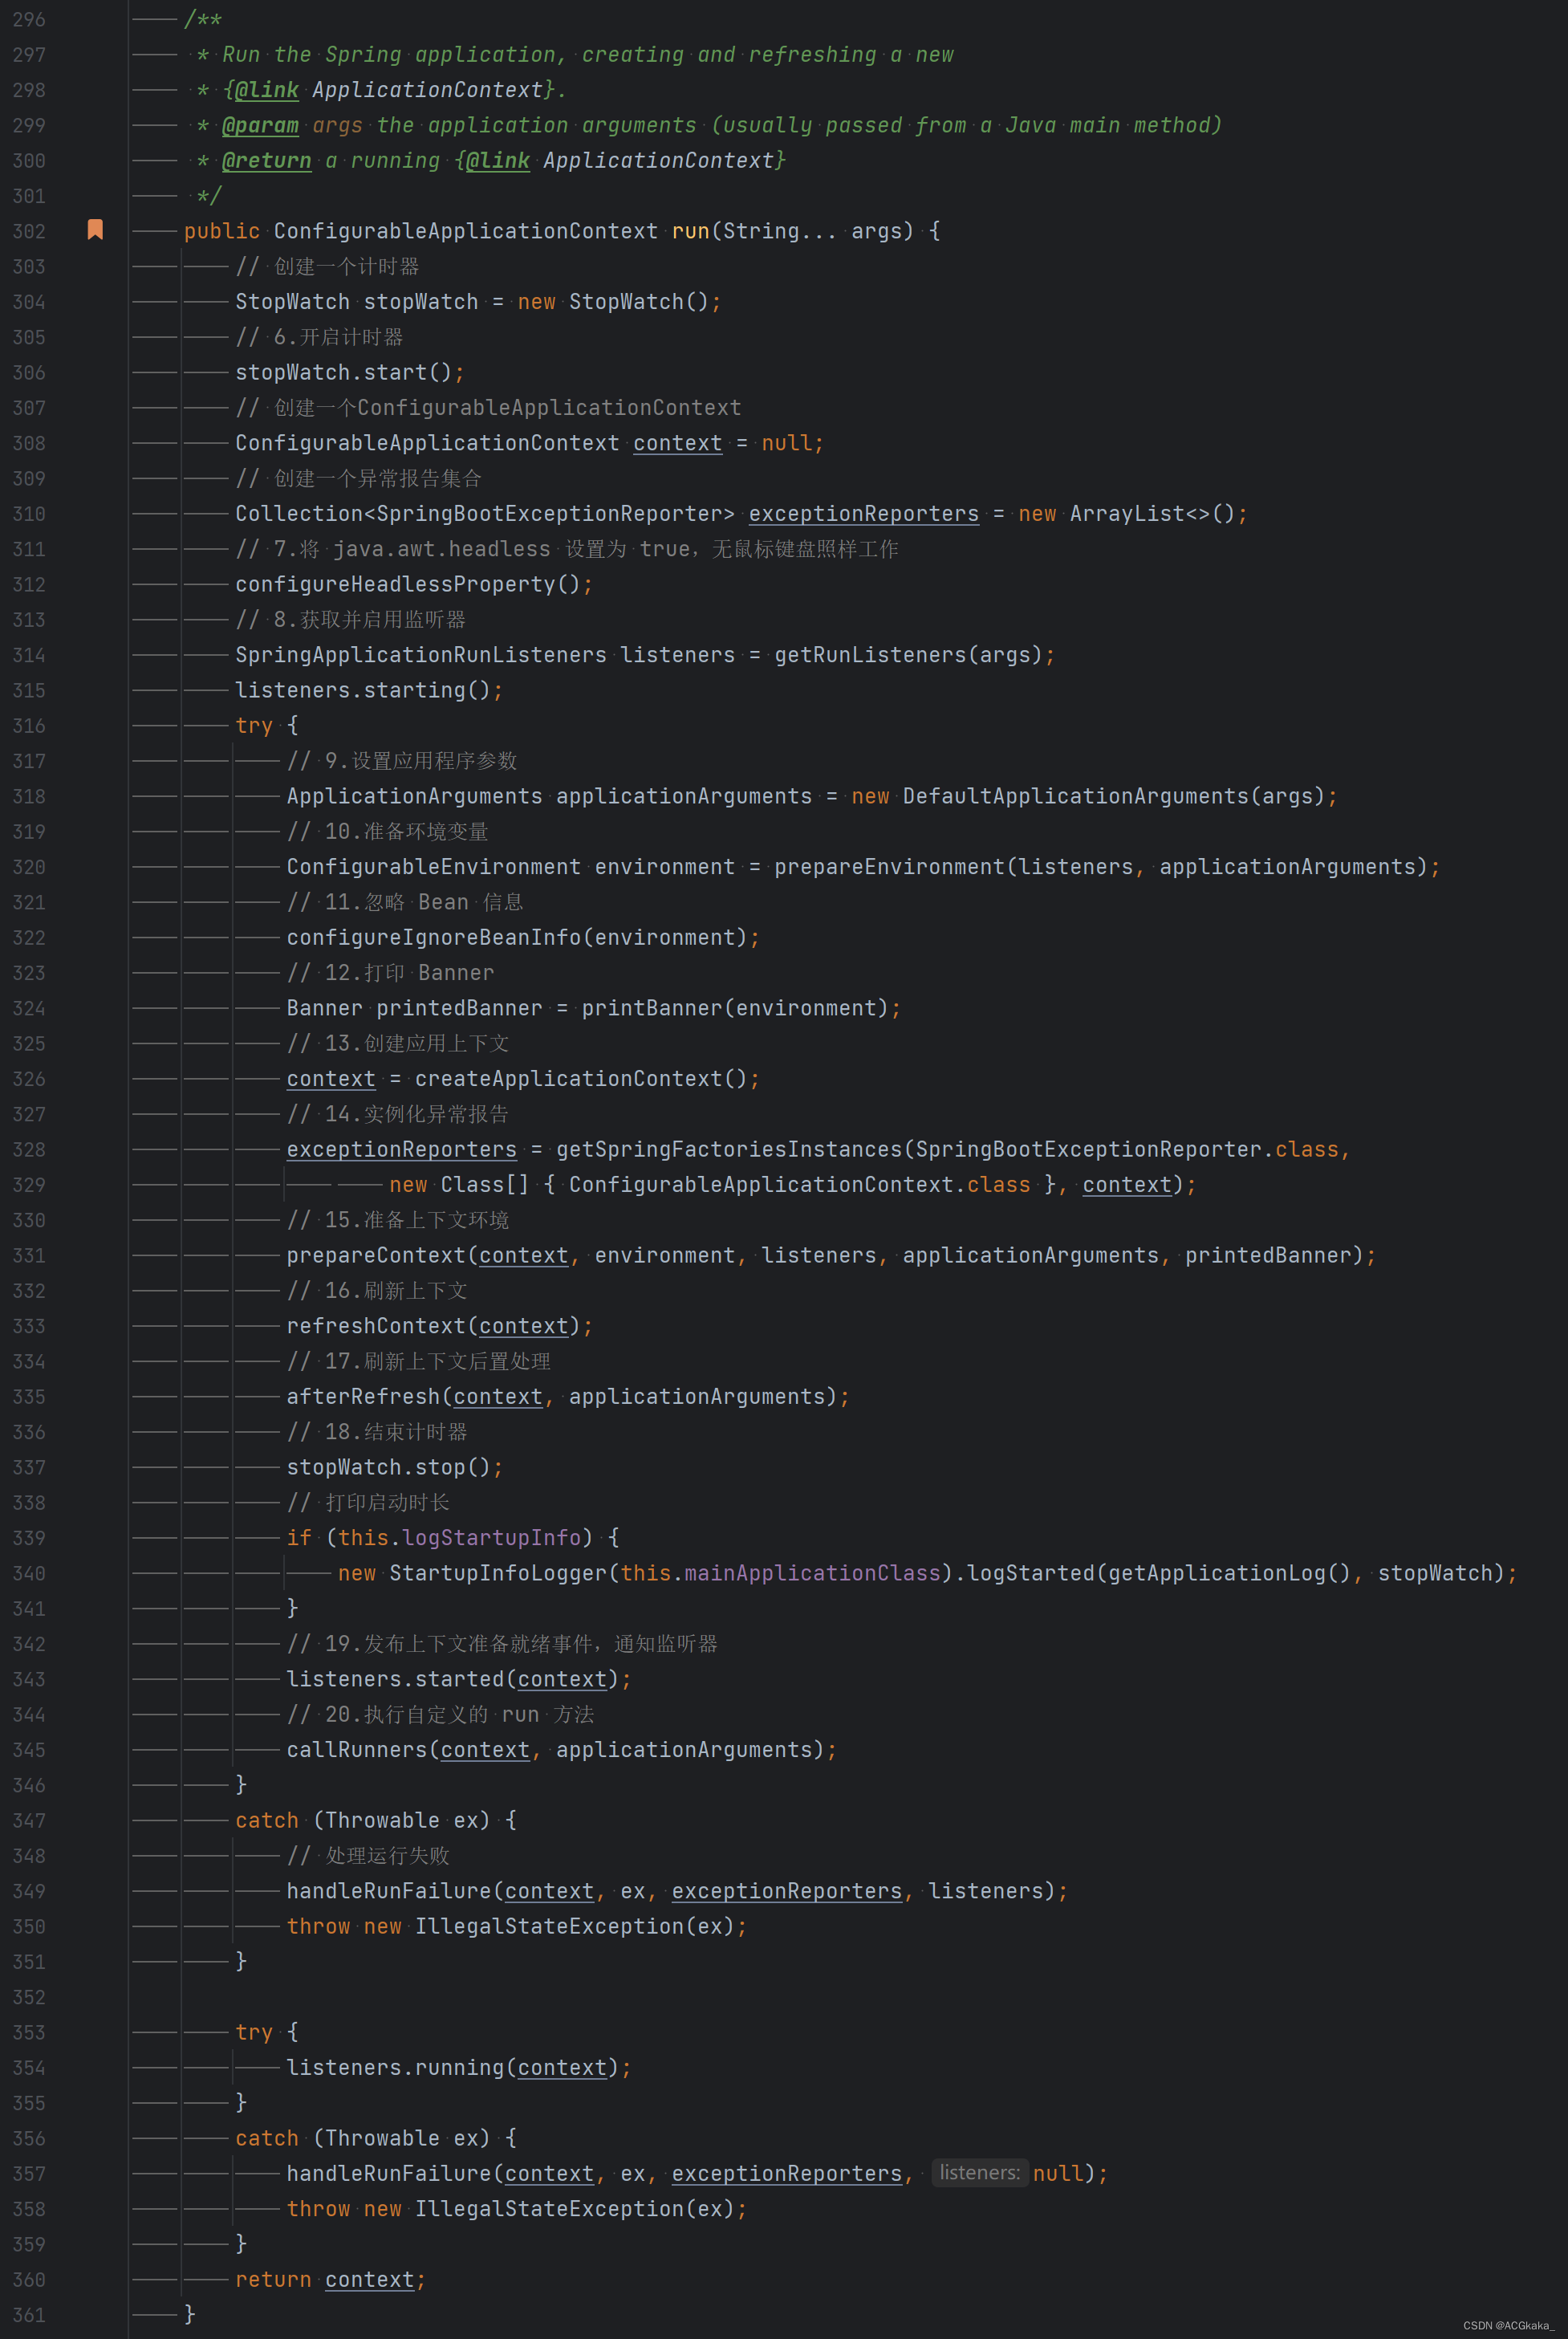
6、开启计时器
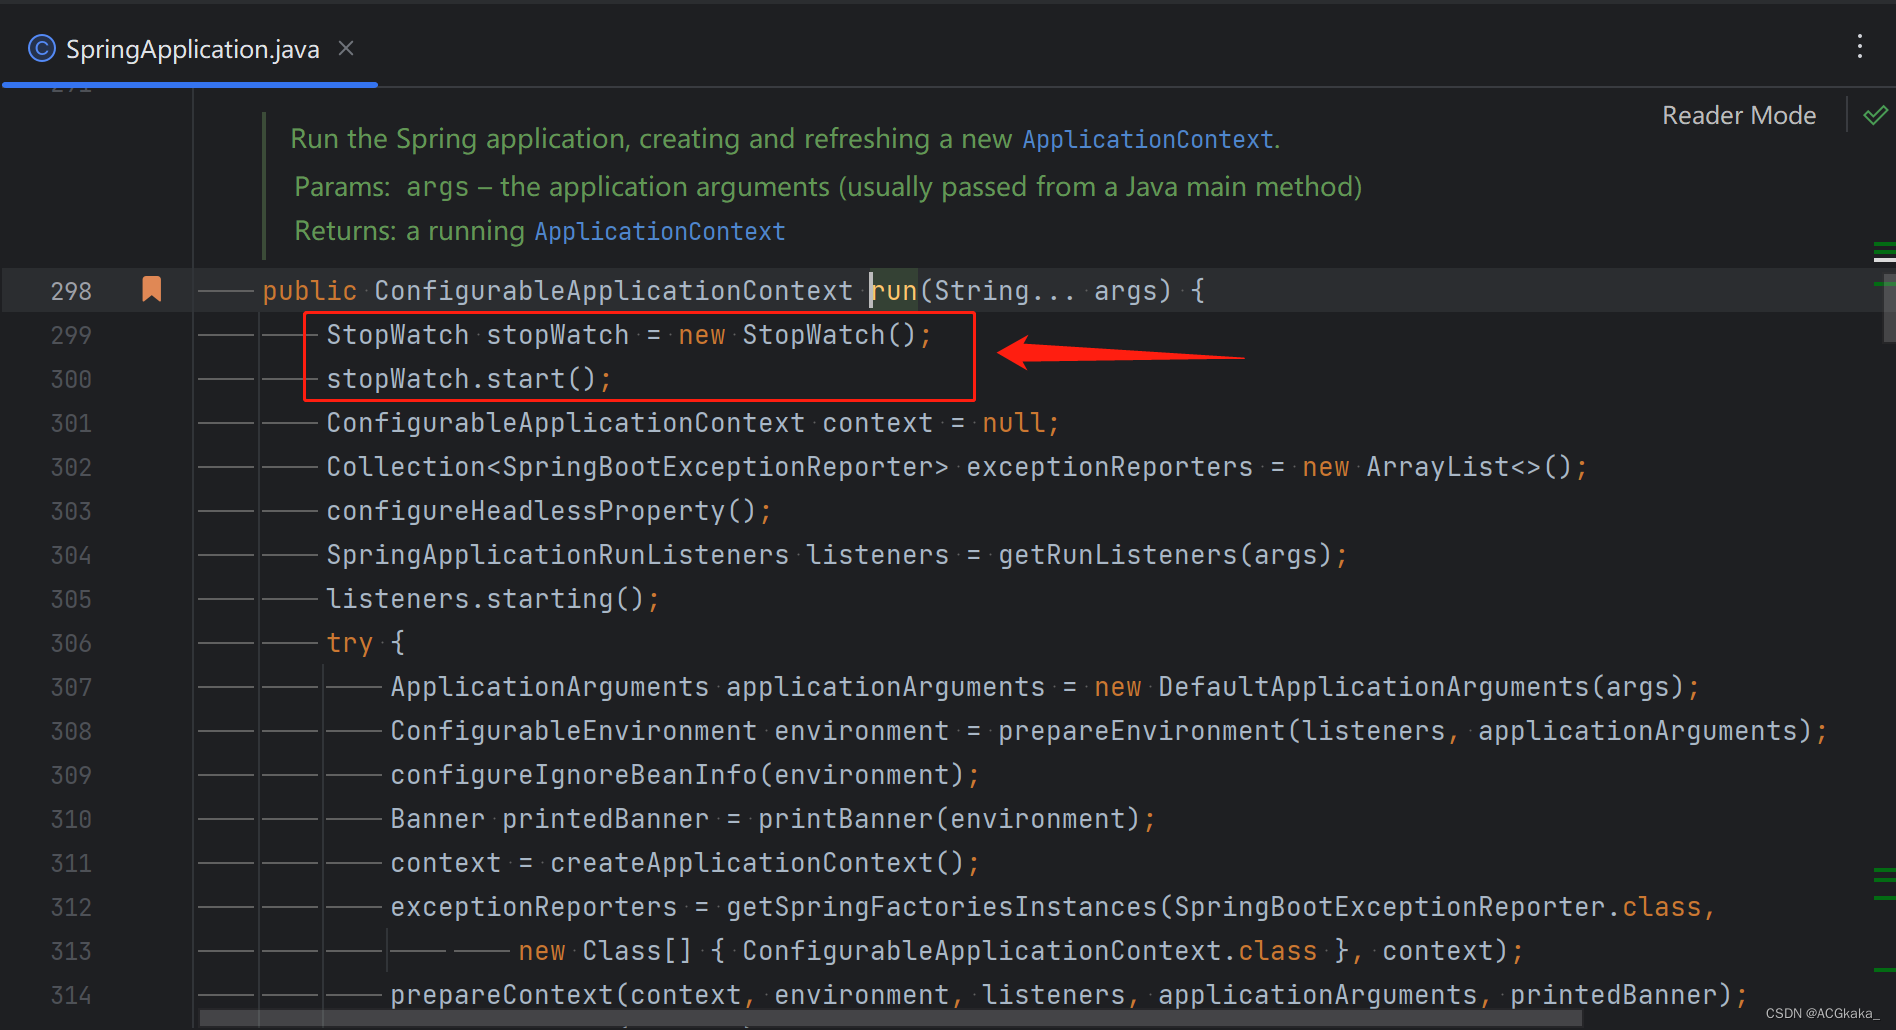
程序运行到这里,就已经进入了 run 方法的主体了,第一步调用的 run 方法是静态方法,那个时候还没实例化 SpringApplication 对象,现在调用的 run 方法是非静态的,是需要实例化后才可以调用的,进来后首先会开启计时器,这个计时器有什么作用呢?顾名思义,就是用来记录 SpringBoot 启动时长的,核心代码如下:
// 实例化计时器
StopWatch stopWatch = new StopWatch();
// 开始计时
stopWatch.start();
run 方法代码段截图:
7、将 java.awt.headless 设置为 true
这里将java.awt.headless 设置为 true,表示运行在服务器端,在没有显示和鼠标键盘的模式下照样可以工作,模拟输入输出设备功能。
做了这样的操作后,SpringBoot 想干什么呢?其实是像设置该应用程序,即使没有检测到显示器,也允许其启动,对于服务器来说,是不需要显示器的,所以要这样设置。
方法主体如下:
private void configureHeadlessProperty() {


   System.setProperty(SYSTEM_PROPERTY_JAVA_AWT_HEADLESS,
         System.getProperty(SYSTEM_PROPERTY_JAVA_AWT_HEADLESS, Boolean.toString(this.headless)));
}
通过方法可以看到,setProperty() 方法里面有有个 getProperty(); 这不是多此一举吗?其实 getProperty() 方法里面有 2 个参数,第一个 key 值,第二个默认值,意思是通过 key 值查找属性值,如果属性值为空,则返回默认值 true;保证了一定有值的情况。
8、获取并启用监听器
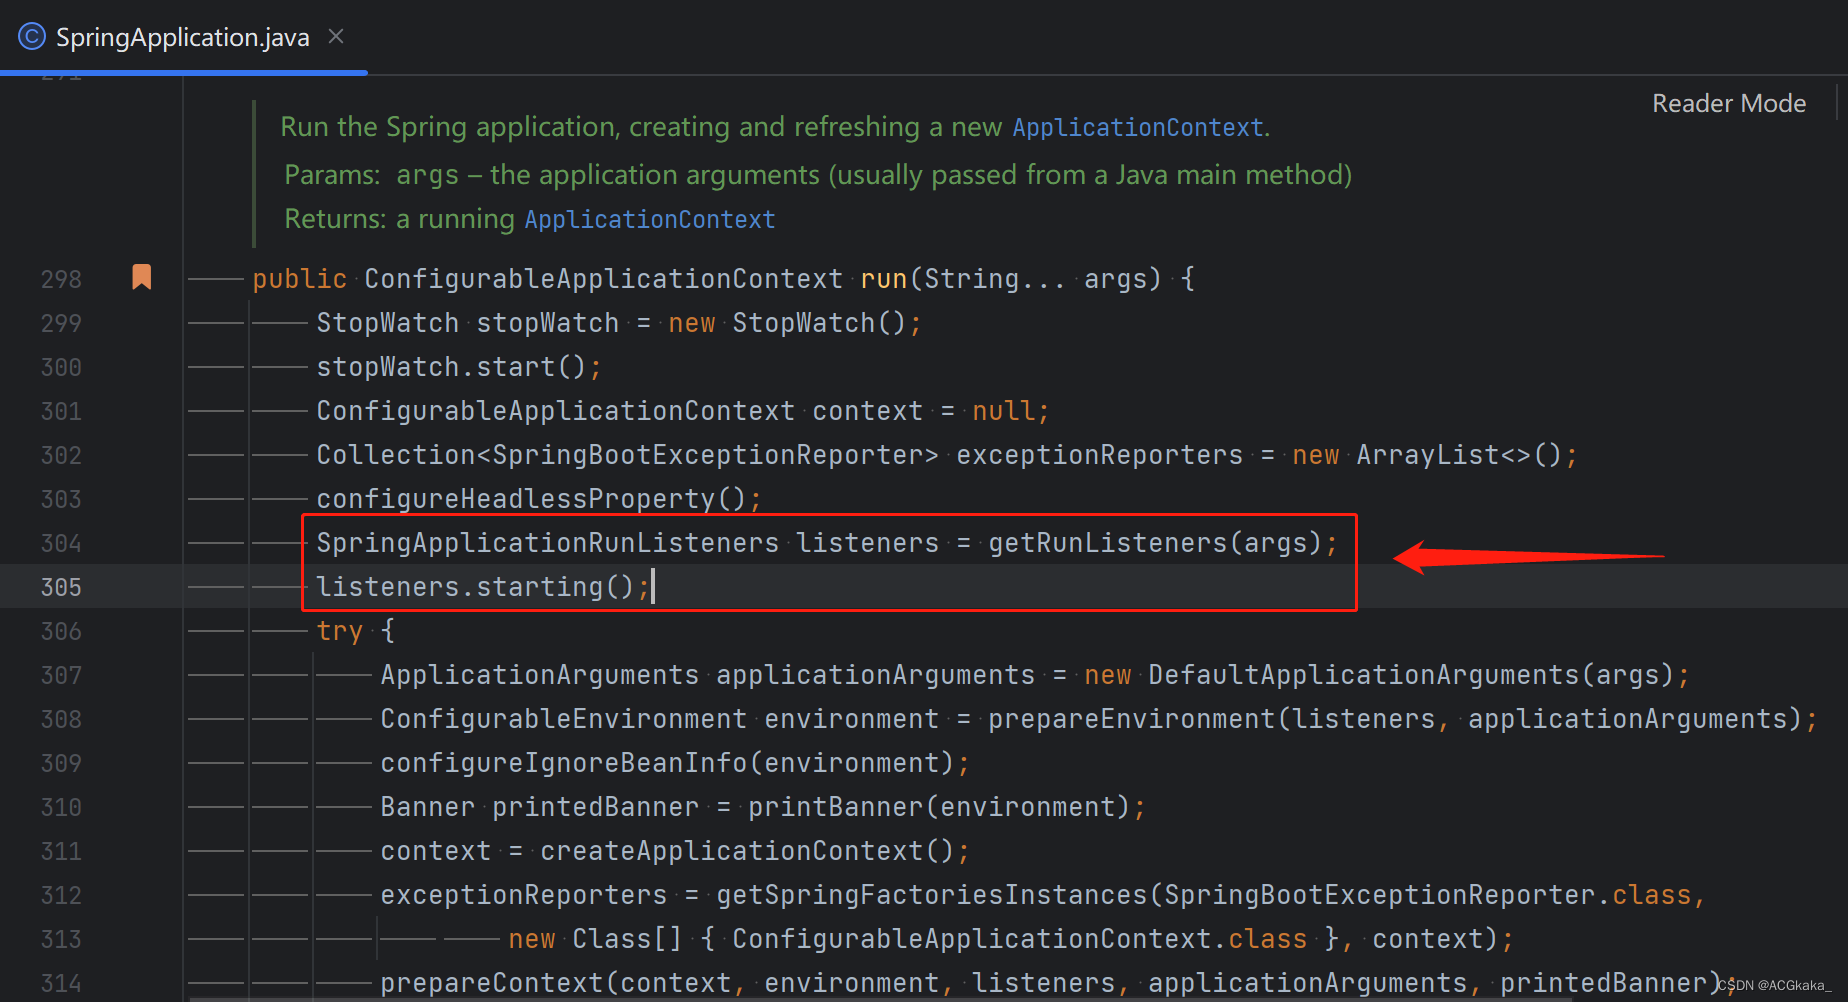
这一步,通过监听器来实现初始化的基本操作,这一步做了 2 件事:
1)创建所有 Spring 运行监听器,并发布应用启动事件。
2)启用监听器。
9、设置应用程序参数
将执行run 方法时传入的参数封装成一个对象。
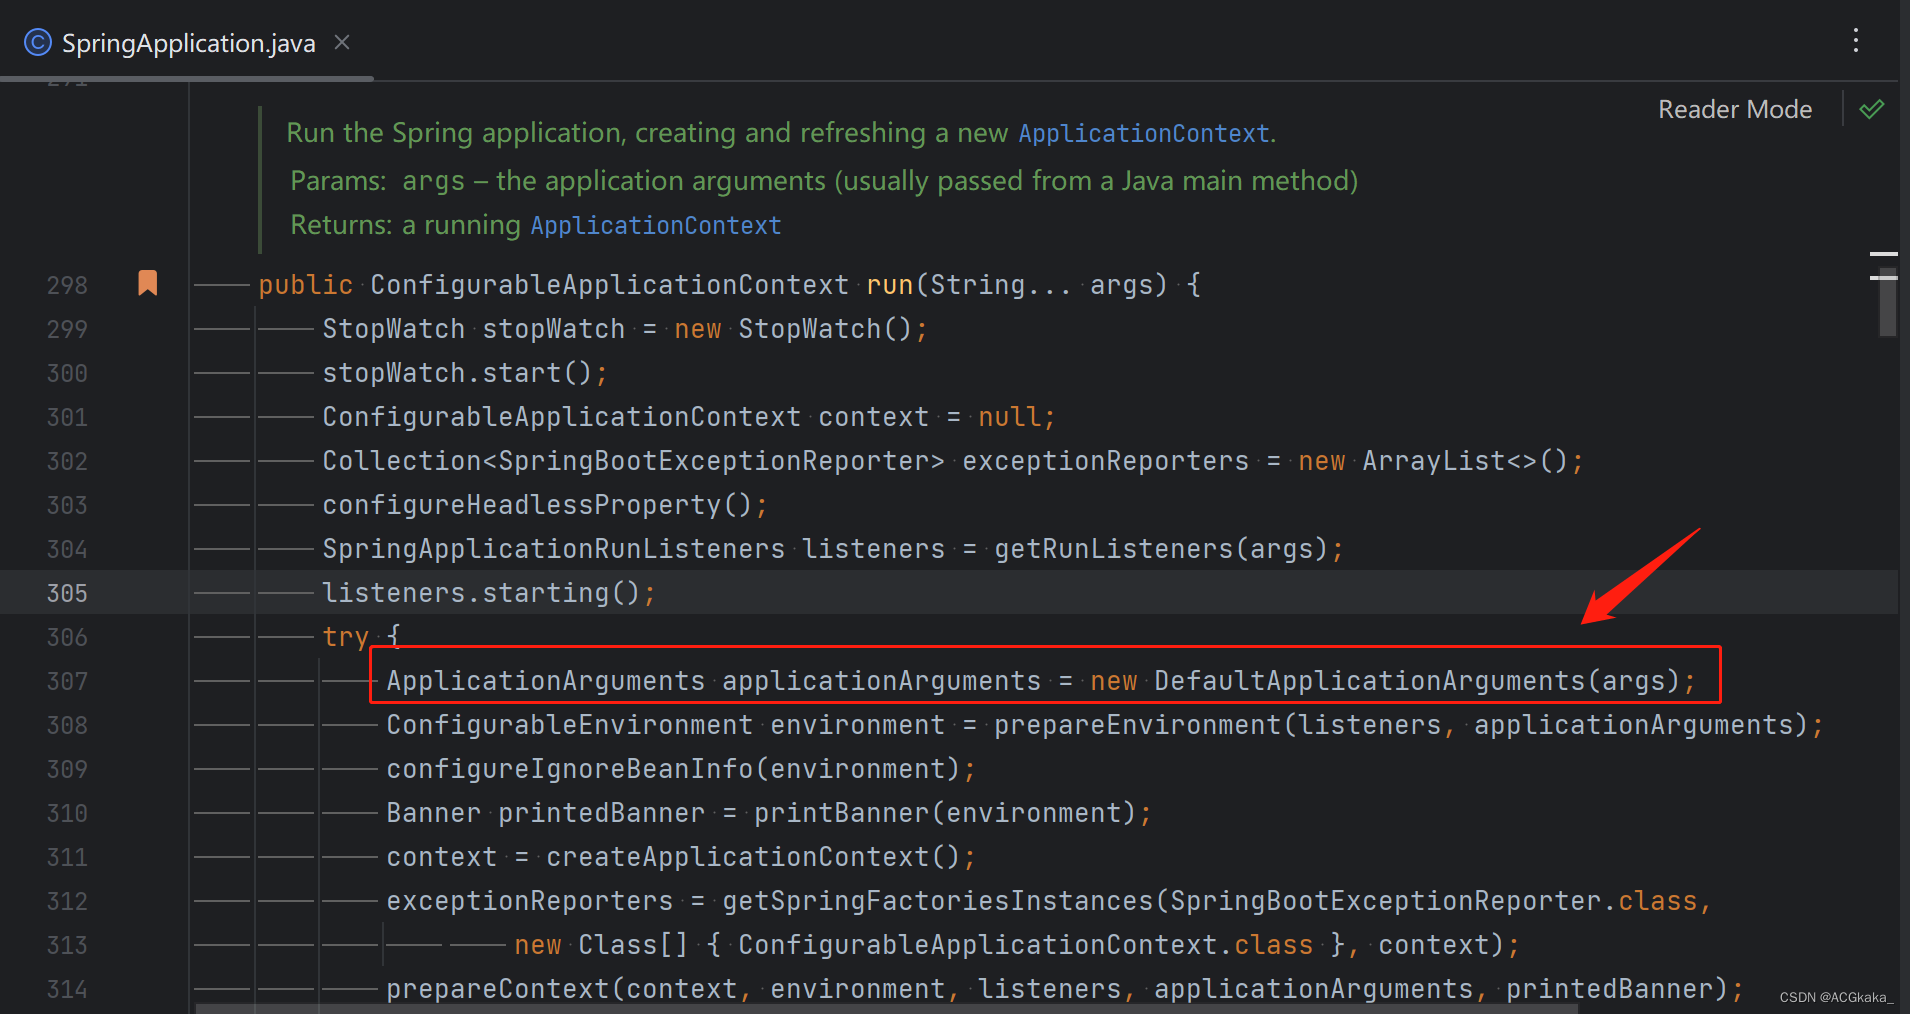
这里只是将参数封装成对象,没啥好说的,对象的构造函数如下:
public DefaultApplicationArguments(String... args) {


   Assert.notNull(args, "Args must not be null");
   this.source = new Source(args);
   this.args = args;
}
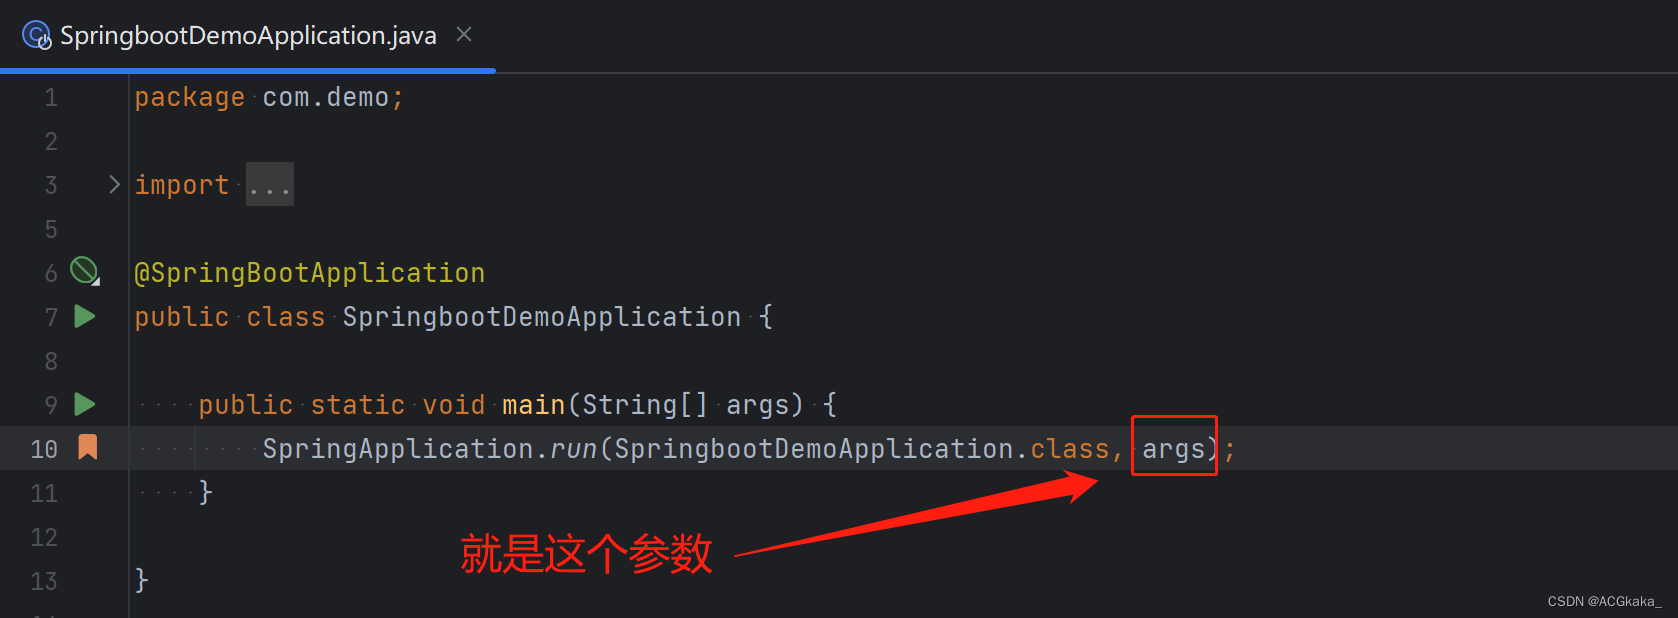
这里的args 参数其实就是 main 方法里面执行静态 run 方法时传入的参数。
10、准备环境变量
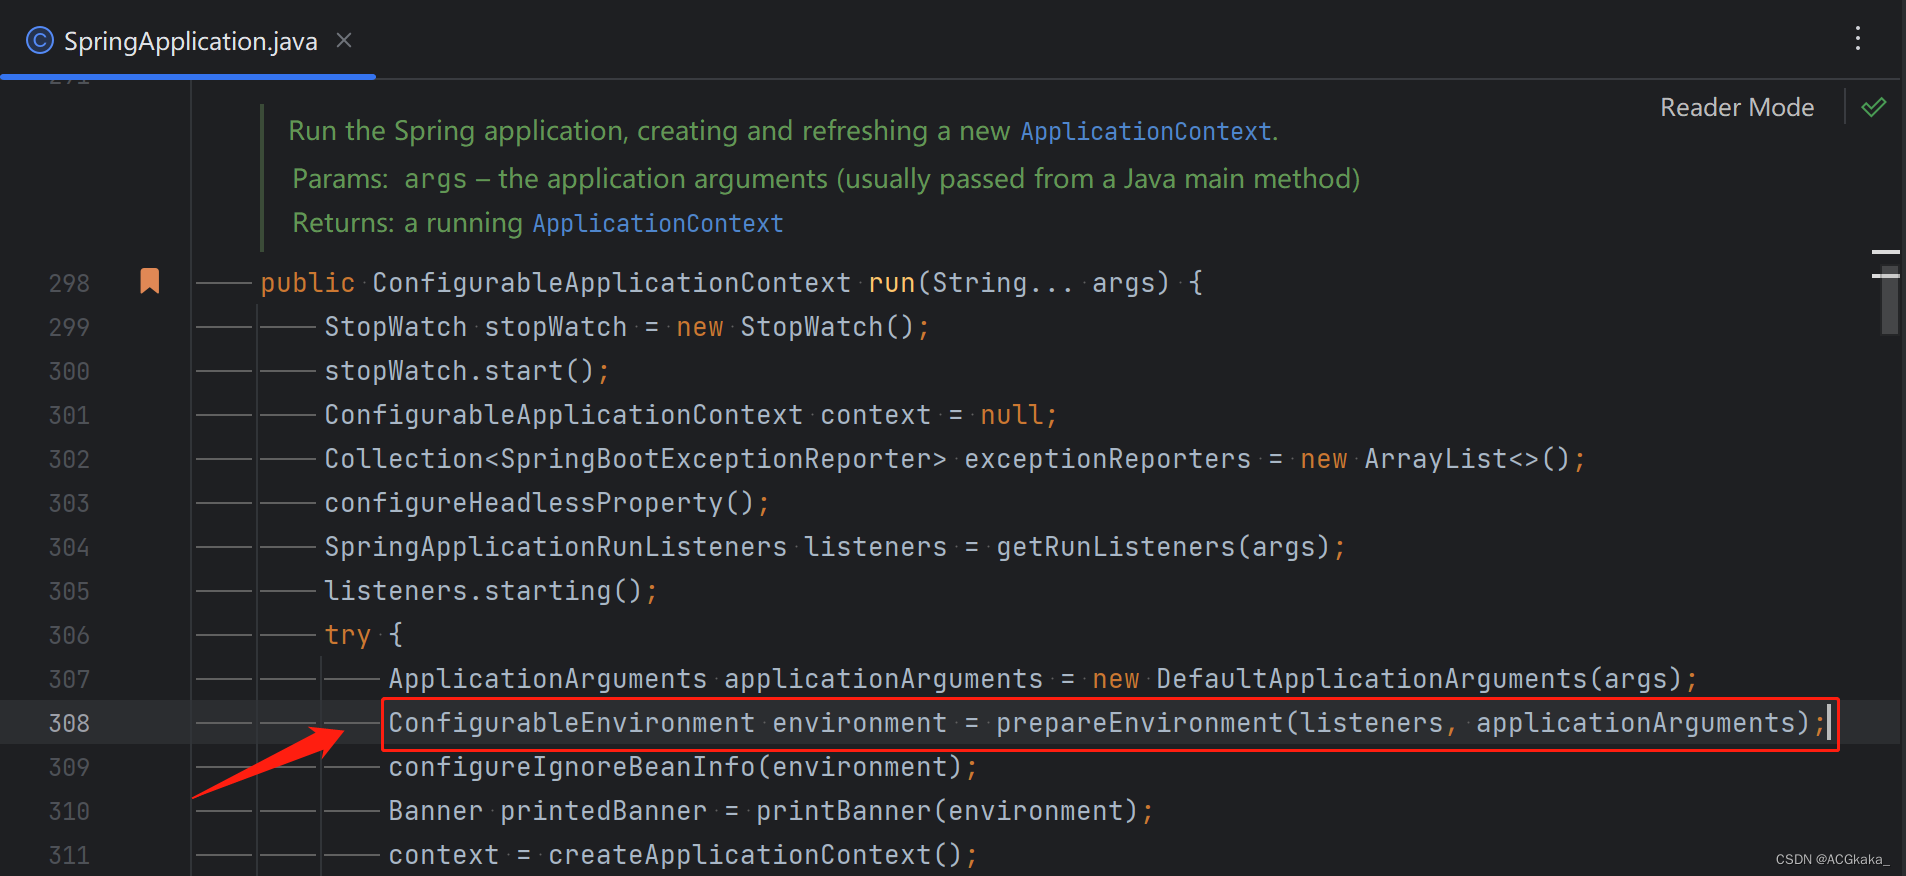
准备环境变量,包括系统属性和用户配置的属性,执行的代码块在 preparedEnvironment 方法内。
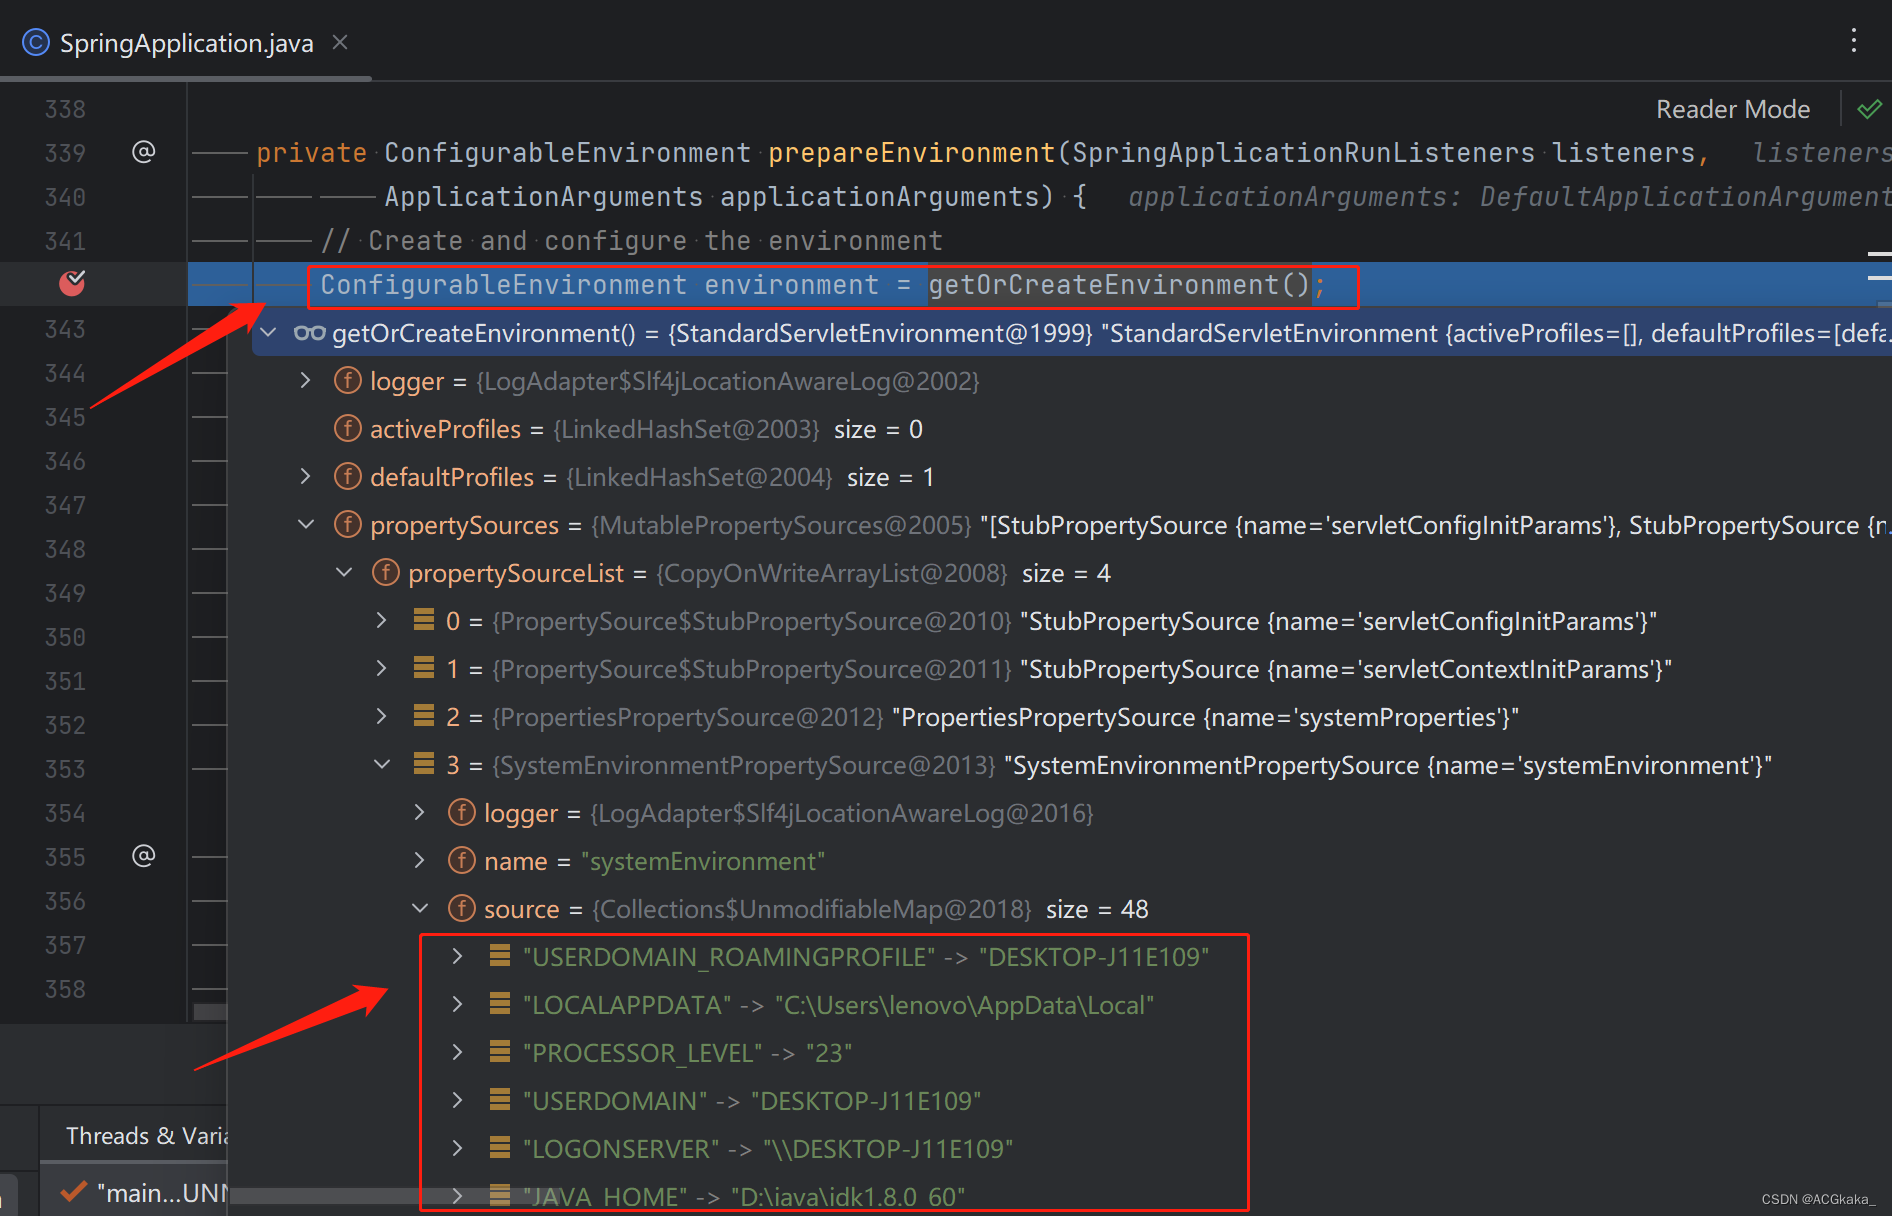
打了断点之后可以看到,它将 Maven 和系统的环境变量都加载进来了。
11、忽略 Bean 信息
configureIgnoreBeanInfo() 这个方法是将 spring.beaninfo.ignore 的默认值设置为 true,意思是忽略 Java Bean 的信息解析:
private void configureIgnoreBeanInfo(ConfigurableEnvironment environment) {


   if (System.getProperty(CachedIntrospectionResults.IGNORE_BEANINFO_PROPERTY_NAME) == null) {


      Boolean ignore = environment.getProperty("spring.beaninfo.ignore", Boolean.class, Boolean.TRUE);
      System.setProperty(CachedIntrospectionResults.IGNORE_BEANINFO_PROPERTY_NAME, ignore.toString());
   }
}
当然也可以在配置文件中添加以下配置来设为 false。
spring.beaninfo.ignore=false
当 spring.beaninfo.ignore 配置被设置为 false 时,Spring 框架会解析 Java Bean 的信息,包括属性、方法、事件等,以便在运行时进行操作。
需要注意的是,在现在的 Java 环境中,Java Bean 的信息解析通常不再需要,而且会对性能产生负面影响。因此,大多数形况下,无需关注或更改该配置。
12、打印 banner 信息
显而易见,这个流程就是用来打印控制台那个很大的 Spring 的 banner 图案,就是下面这个东西:
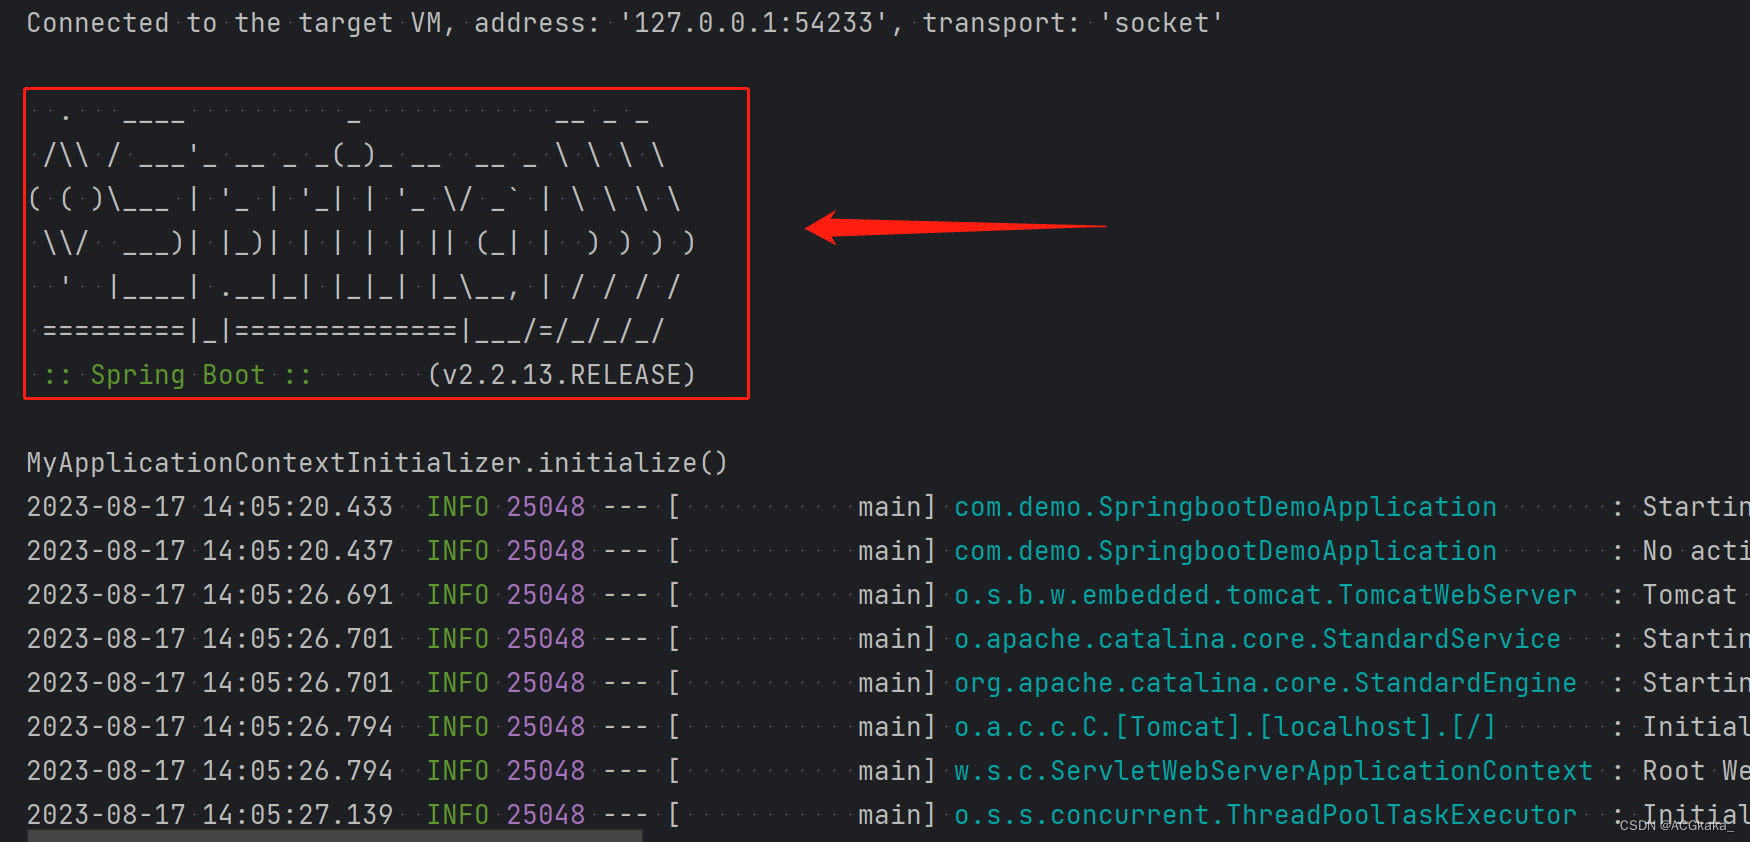
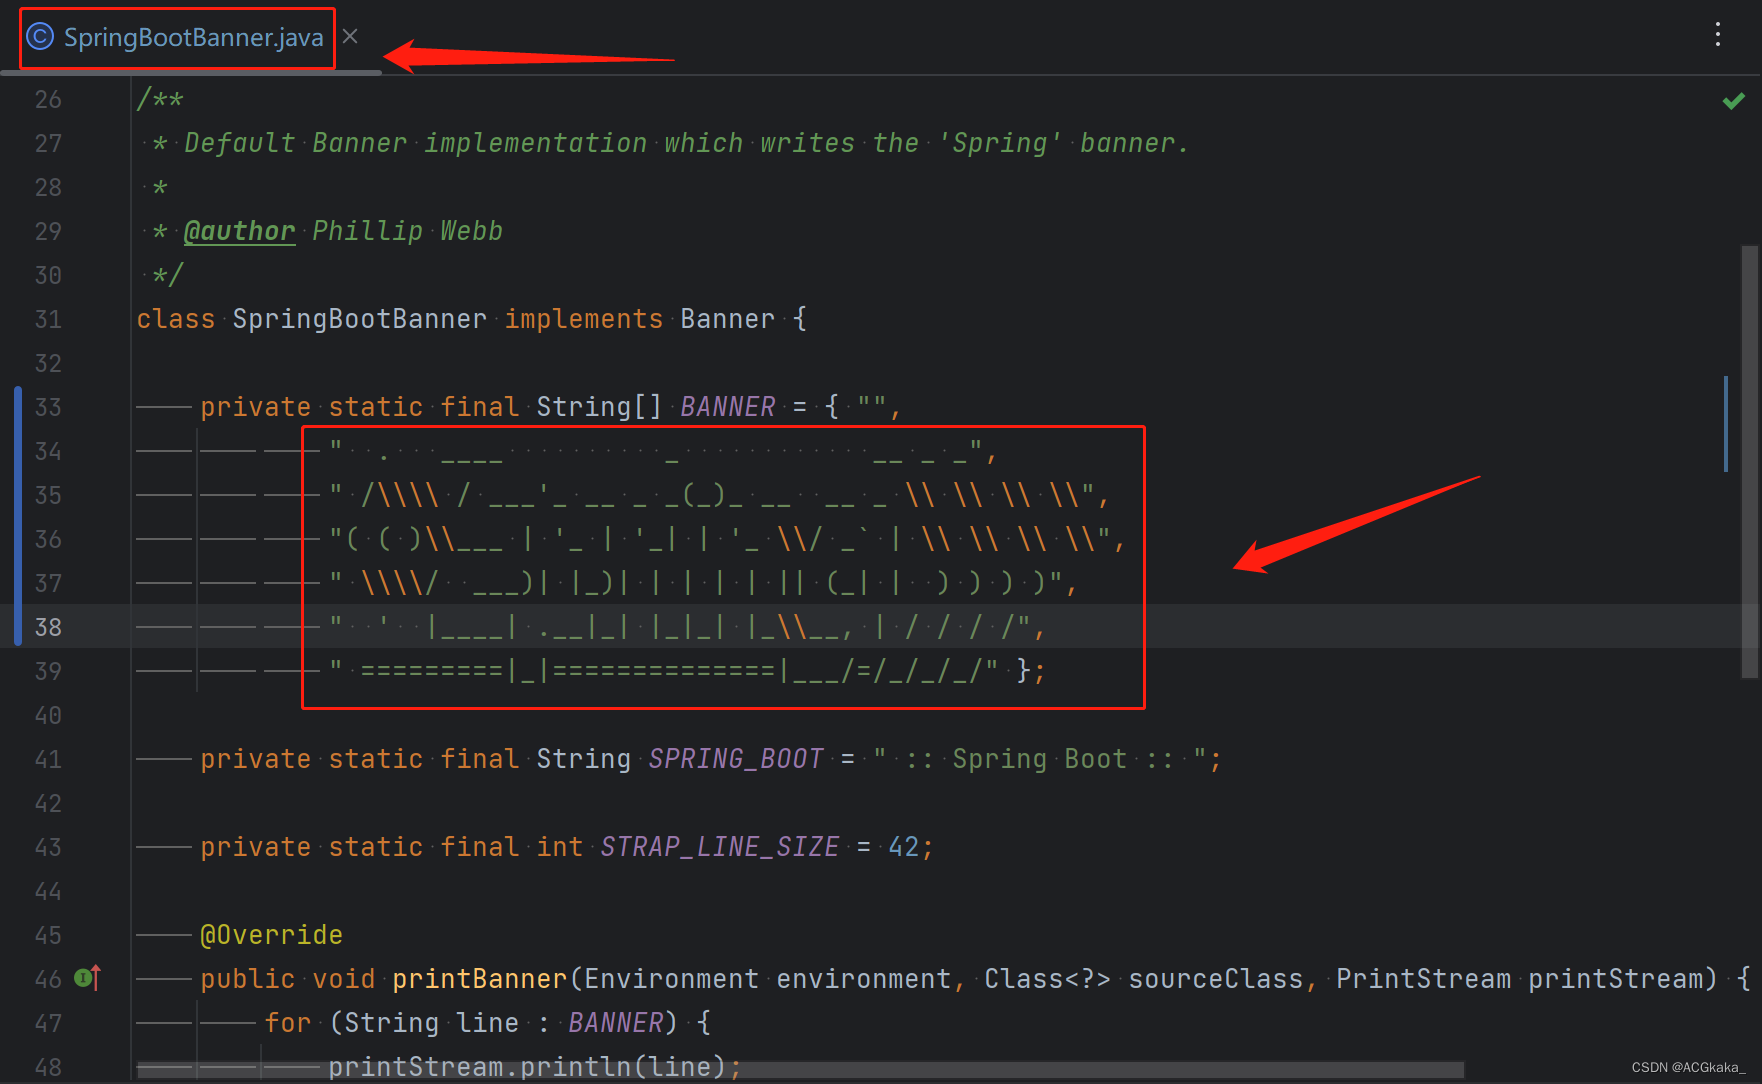
那他在哪里打印的呢?是在 SpringBootBanner.java 里面打印的,这个类实现了 Banner 接口,而且 banner 信息时直接在代码里面写死的。
13、创建应用程序的上下文
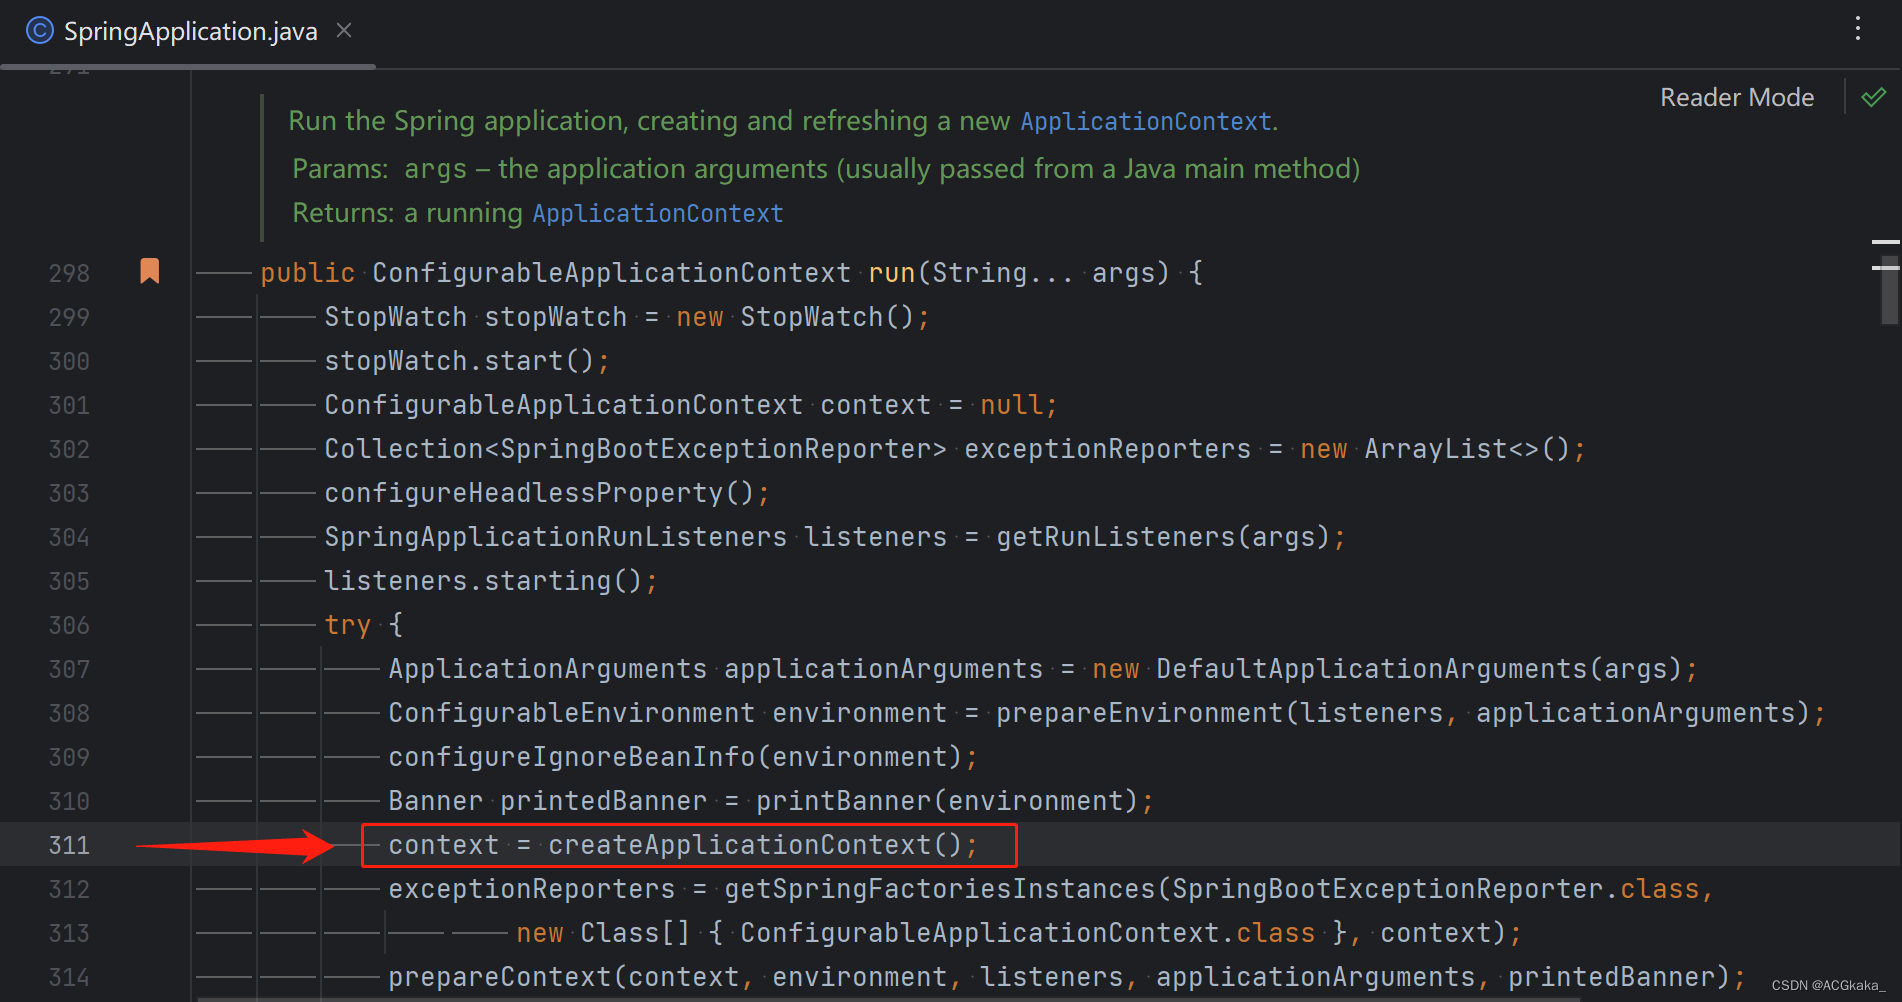
实例化ApplicationContext(应用程序的上下文),调用 createApplicationContext() 方法,这里就使用反射创建对象,没什么好说的。
14、实例化异常报告器
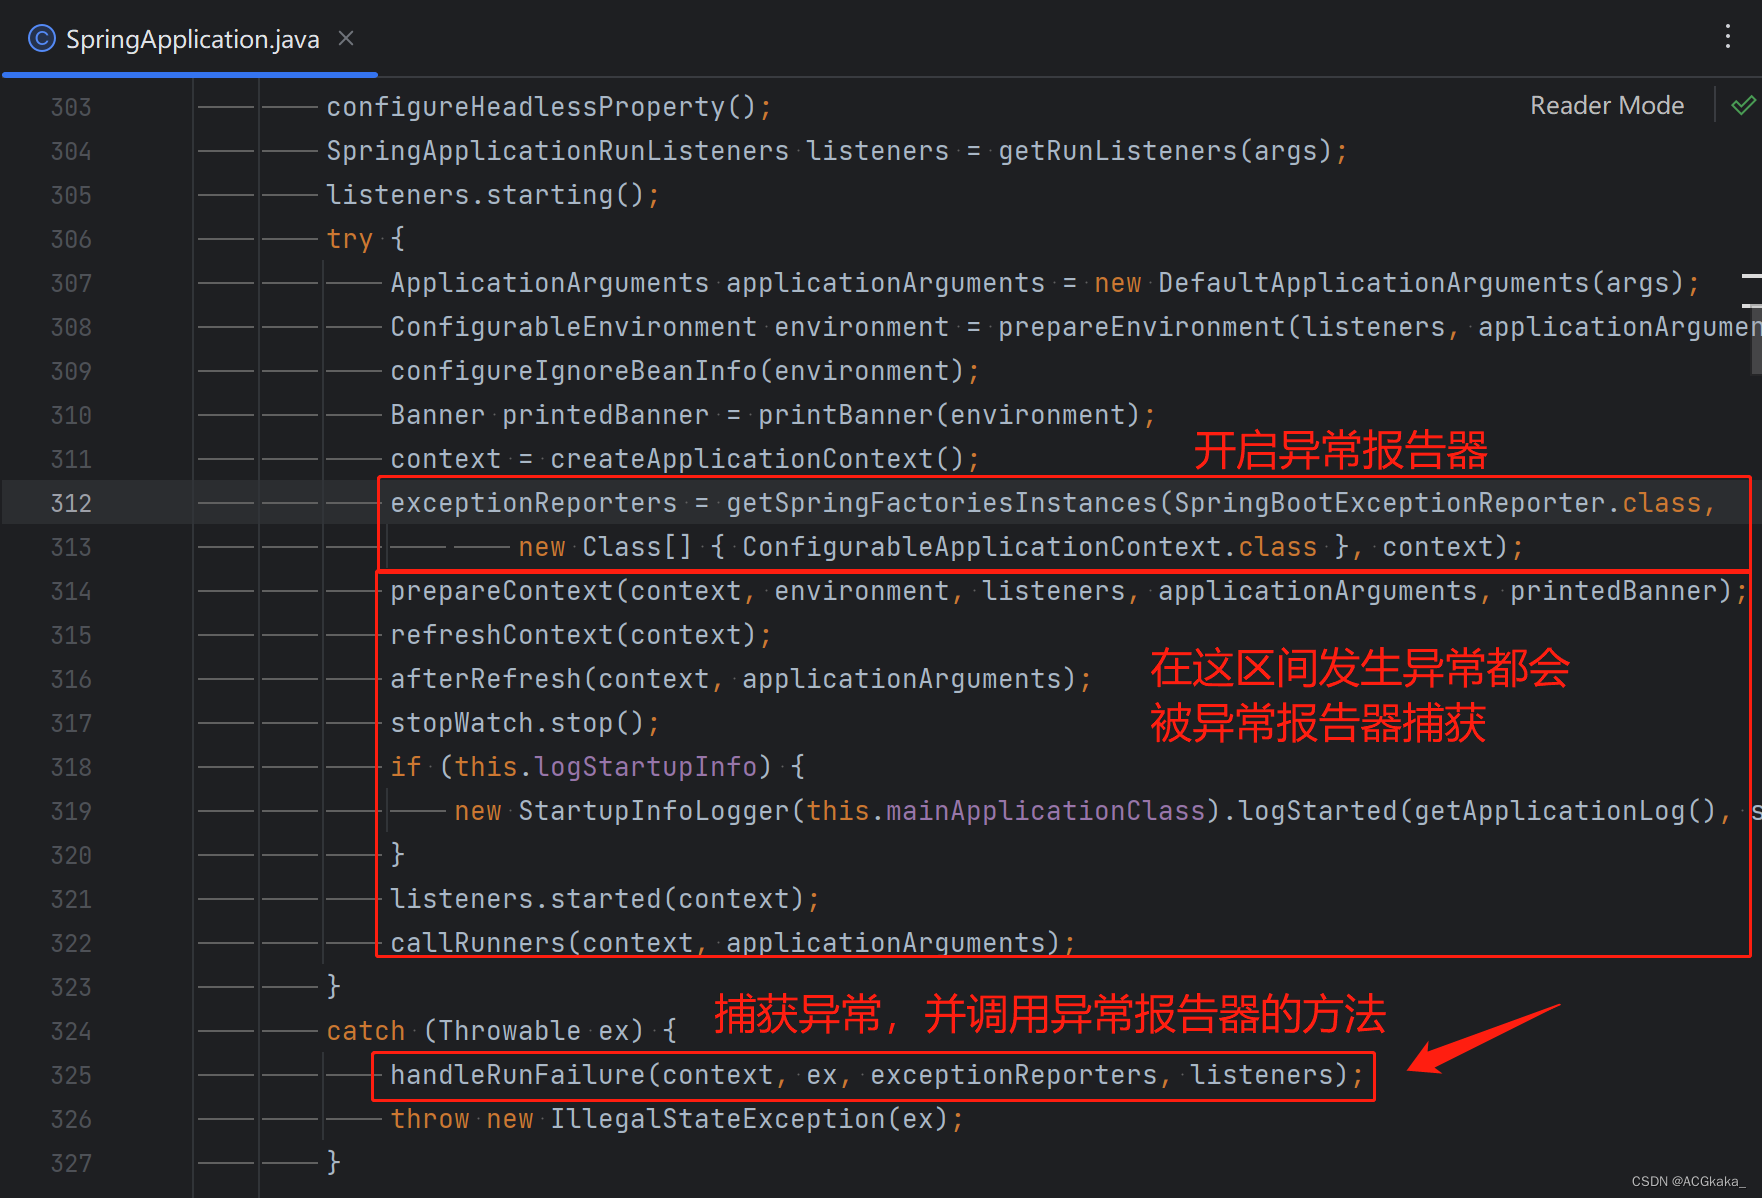
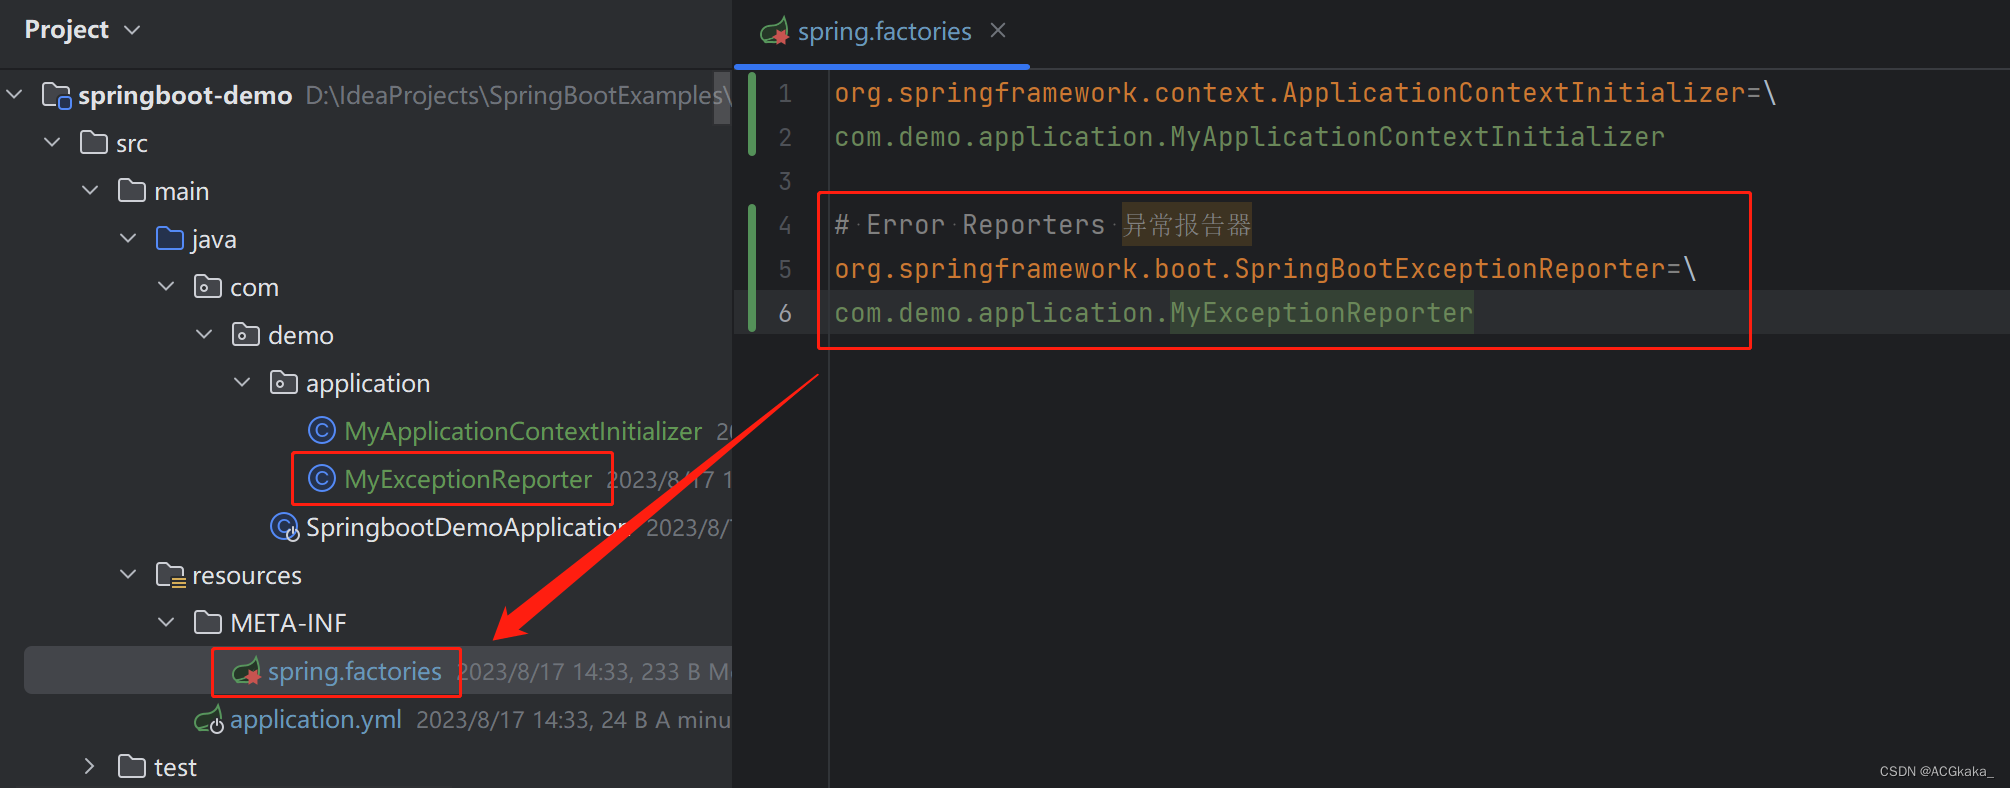
异常报告器时用来捕获全局异常使用的,当 SpringBoot 应用程序在发生异常时,异常报告器会将其捕捉并作响应处理,在 spring.factories 文件里配置了默认的异常报告器:

需要注意的是,这个异常报告器只会捕获启动过程抛出的异常,如果是在启动完成后,在用户请求时报错,异常捕获器不会捕获请求中出现的异常。
了解了远离了,接下来我们自己配置一个异常报告器试试。
创建 MyExceptionReporter.java 类,继承 SpringBootExceptionReporter 接口。
import org.springframework.boot.SpringBootExceptionReporter;
import org.springframework.context.ConfigurableApplicationContext;

/**
 * 自定义异常报告器
 */
public class MyExceptionReporter implements SpringBootExceptionReporter {


    private ConfigurableApplicationContext context;

    // 必须要有一个有参构造函数,否则启动会报错
    MyExceptionReporter(ConfigurableApplicationContext context) {


        this.context = context;
    }

    @Override
    public boolean reportException(Throwable failure) {


        System.out.println("MyExceptionReporter.reportException() is called.");
        failure.printStackTrace();
        // 返回false会打印详细 SpringBoot 报错信息,返回true则纸打印异常信息。
        return false;
    }
}
在 spring.factories 文件中注册异常报告器。
# Error Reporters 异常报告器
org.springframework.boot.SpringBootExceptionReporter=\
com.demo.application.MyExceptionReporter
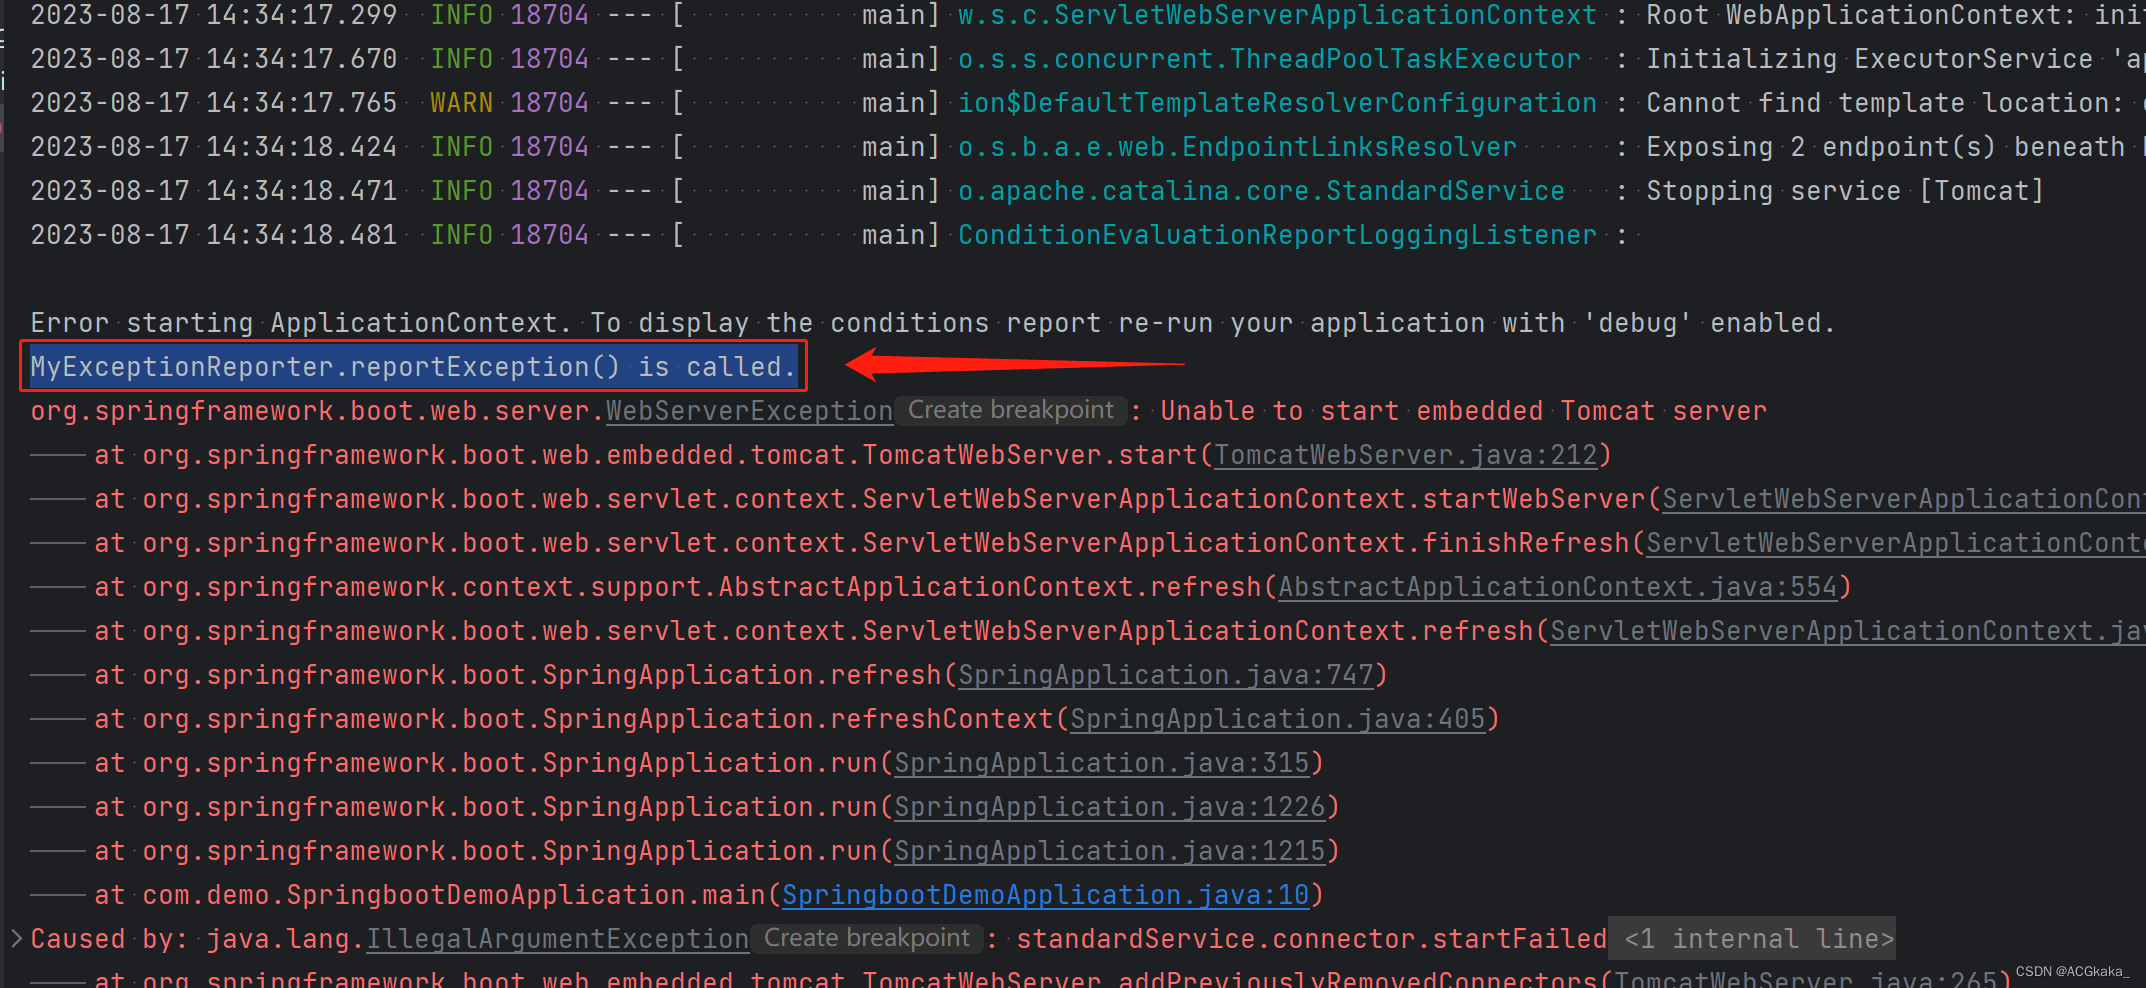
然后我们在 application.yml 中把端口设置为一个很大的值(端口的最大值为 65535),我们设置为 5 个 8:
server:
  port: 88888
启动后,控制台打印截图如下:
15、准备上下文环境
这里准备的上下文环境是为了下一步刷新做准备的, 里面还做了一些额外的事情:

15.1、实例化单例的 beanName 生成器
在 postProcessApplicationContext(context); 方法里面。使用单例模式创建了 BeanNameGenerator 对象,其实就是 beanName 生成器,用来生成 bean 对象的名称。
15.2、执行初始化方法
初始化方法有哪些呢?还记得第 3 步里面加载的初始化器吗?其实是执行第 3 步加载出来的所有初始化器,实现了 ApplicationContextInitializer 接口的类。
15.3、将启动参数注册到容器中
这里将启动参数以单例的模式注册到容器中,是为了以后方便拿来使用,参数的 beanName 为:springApplicationArguments。
16、refresh 刷新上下文(实例化 Bean)
刷新上下文就到了 Spring 的范畴了,这里进行了自动装配和启动 tomcat,以及其他 Spring 自带的机制。这里我们主要看一下 refresh() 方法包含了哪些内容,以及 Bean 对象的创建具体是如何进行的?
16.1、refresh() 方法内容
public void refresh() throws BeansException, IllegalStateException {


    synchronized (this.startupShutdownMonitor) {


        //为容器初始化做准备
        prepareRefresh();

        // 解析xml和注解
        ConfigurableListableBeanFactory beanFactory = obtainFreshBeanFactory();

        // 给BeanFacory设置属性值以及添加一些处理器,即准备Spring的上下文环境
        prepareBeanFactory(beanFactory);

        try {


            // 由子类实现对BeanFacoty的一些后置处理
            postProcessBeanFactory(beanFactory);

            /*
            * BeanDefinitionRegistryPostProcessor
            * BeanFactoryPostProcessor
            * 完成对这两个接口的调用
            */
            invokeBeanFactoryPostProcessors(beanFactory);

            /*
            * 把实现了BeanPostProcessor接口的类实例化,并且加入到BeanFactory中
            */
            registerBeanPostProcessors(beanFactory);

            /*
            * 国际化
            */
            initMessageSource();

            //初始化事件管理类
            initApplicationEventMulticaster();

            //这个方法着重理解模板设计模式,因为在springboot中,这个方法是用来做内嵌tomcat启动的
            onRefresh();

            /*
            * 往事件管理类中注册事件类
            */
            registerListeners();

            /*
            * 1、bean实例化过程
            * 2、依赖注入
            * 3、注解支持
            * 4、BeanPostProcessor的执行
            * 5、Aop的入口
            */
            finishBeanFactoryInitialization(beanFactory);

            // Last step: publish corresponding event.
            finishRefresh();
        } finally {


            resetCommonCaches();
        }
    }
}
16.2、Bean 对象的创建
当前面的准备工作做好后,就开始初始化 Bean 实例了,也就是 finishBeanFactoryInitialization 方法所作的事。不过这里可不是根据 BeanDefinition 去 new 一个对象就完了,它包含了以下几个工作:
- 初始化实例。
- 解析 @PostConstruct、@PreDestroy、@Resource、@Autowired、@Value 等注解。
- 依赖注入。
- 调用 BeanPostProcessor 方法。
- AOP 入口。
protected void finishBeanFactoryInitialization(ConfigurableListableBeanFactory beanFactory) {


    ......

    //重点看这个方法
    // Instantiate all remaining (non-lazy-init) singletons.
    beanFactory.preInstantiateSingletons();
}

public void preInstantiateSingletons() throws BeansException {


    if (logger.isTraceEnabled()) {


        logger.trace("Pre-instantiating singletons in " + this);
    }

    // Iterate over a copy to allow for init methods which in turn register new bean definitions.
    // While this may not be part of the regular factory bootstrap, it does otherwise work fine.
    // xml解析时,讲过,把所有beanName都缓存到beanDefinitionNames了
    List<String> beanNames = new ArrayList<>(this.beanDefinitionNames);

    // Trigger initialization of all non-lazy singleton beans...
    for (String beanName : beanNames) {


        // 把父BeanDefinition里面的属性拿到子BeanDefinition中
        RootBeanDefinition bd = getMergedLocalBeanDefinition(beanName);

        //如果不是抽象的,单例的,非懒加载的就实例化
        if (!bd.isAbstract() && bd.isSingleton() && !bd.isLazyInit()) {


            //判断bean是否实现了FactoryBean接口,这里可以不看
            if (isFactoryBean(beanName)) {


                Object bean = getBean(FACTORY_BEAN_PREFIX + beanName);
                if (bean instanceof FactoryBean) {


                    final FactoryBean<?> factory = (FactoryBean<?>) bean;
                    boolean isEagerInit;
                    if (System.getSecurityManager() != null && factory instanceof SmartFactoryBean) {


                        isEagerInit = AccessController.doPrivileged((PrivilegedAction<Boolean>)
                                        ((SmartFactoryBean<?>) factory)::isEagerInit,
                                getAccessControlContext());
                    }
                    else {


                        isEagerInit = (factory instanceof SmartFactoryBean &&
                                ((SmartFactoryBean<?>) factory).isEagerInit());
                    }
                    if (isEagerInit) {


                        getBean(beanName);
                    }
                }
            }
            else {


                //主要从这里进入,看看实例化过程
                getBean(beanName);
            }
        }
    }
}
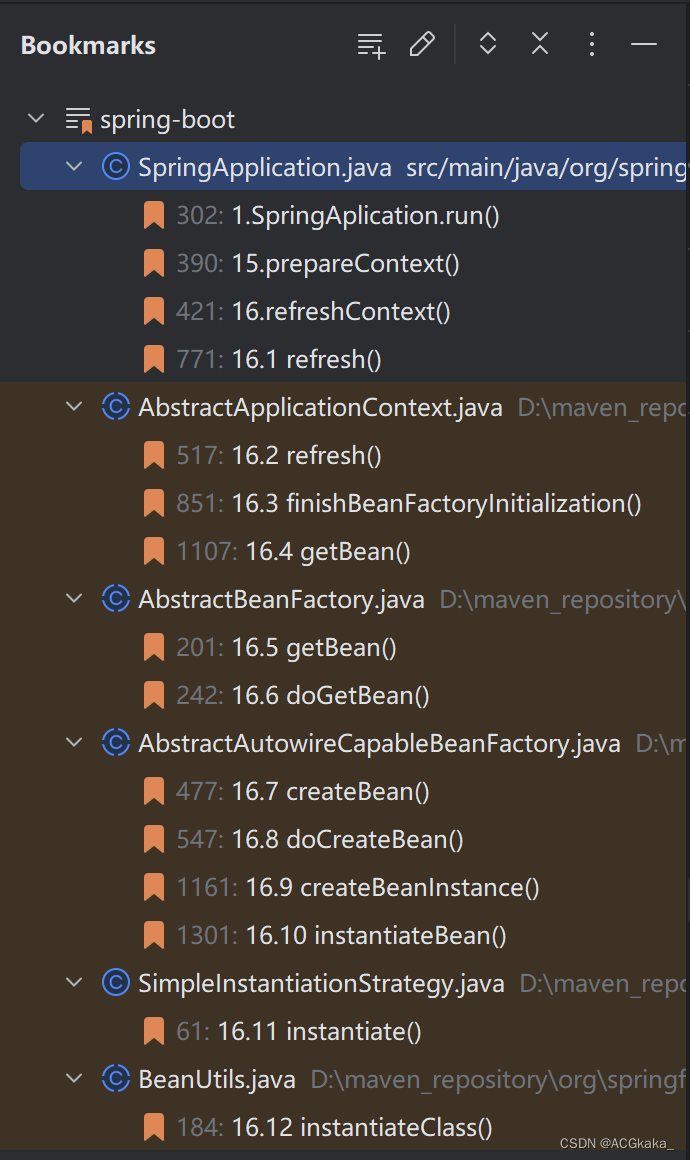
为了方便查看和理解,我整理一下 Bean 实例化过程中的调用链。
(其中的序号只是为了表示从 SpringApplication.refresh() 开始的调用层深度。)
SpringApplicationAbstractApplicationContextAbstractBeanFactoryAbstractAutowireCapableBeanFactorySimpleInstantiationStrategyBeanUtilsrun()refreshContext()1_refresh()2_refresh()3_finishBeanFactoryInitialization()4_getBean()5_getBean()6_doGetBean()7_createBean()8_doCreateBean()9_createBeanInstance()10_instantiateBean()11_instantiate()12_instantiateClass()SpringApplicationAbstractApplicationContextAbstractBeanFactoryAbstractAutowireCapableBeanFactorySimpleInstantiationStrategyBeanUtils
代码具体位置截图如下:
其他详细内容,可以参考下这位大佬的文章:Spring 的 Bean 实例化原理,这一次彻底搞懂了!
17、刷新上下文后置处理
afterRefresh 方法是启动后的一些处理,留给用户扩展使用,目前这个方法里面是空的。
/**
 * Called after the context has been refreshed.
 * @param context the application context
 * @param args the application arguments
 */
protected void afterRefresh(ConfigurableApplicationContext context, ApplicationArguments args) {


}
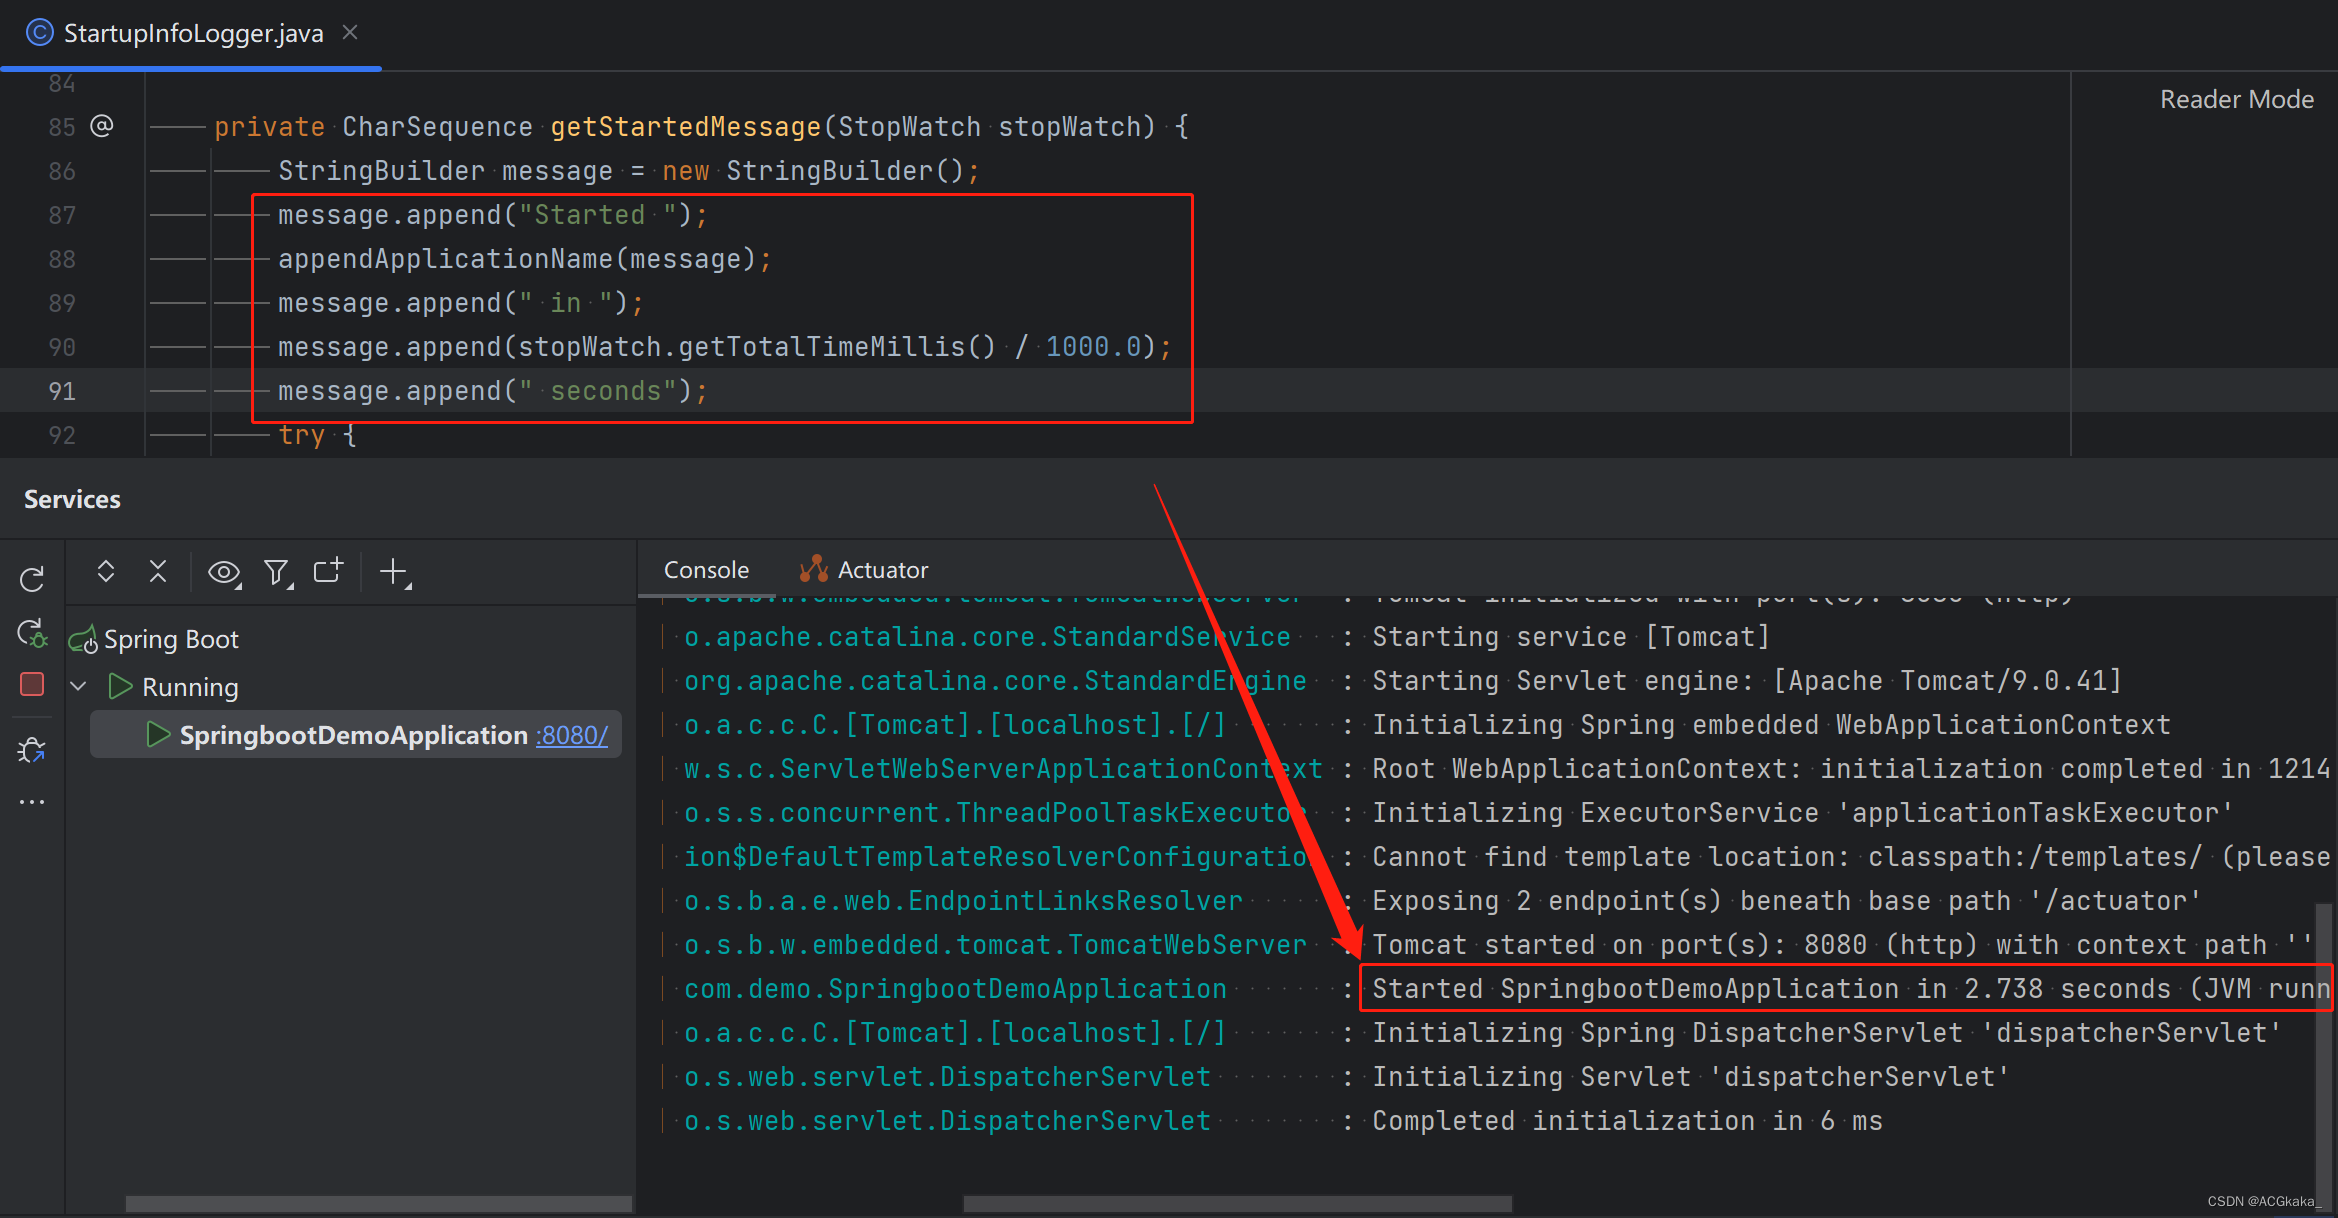
18、结束计时器
到这一步,SpringBoot 其实就已经完成了,计时器会打印 SpringBoot 的启动时长。
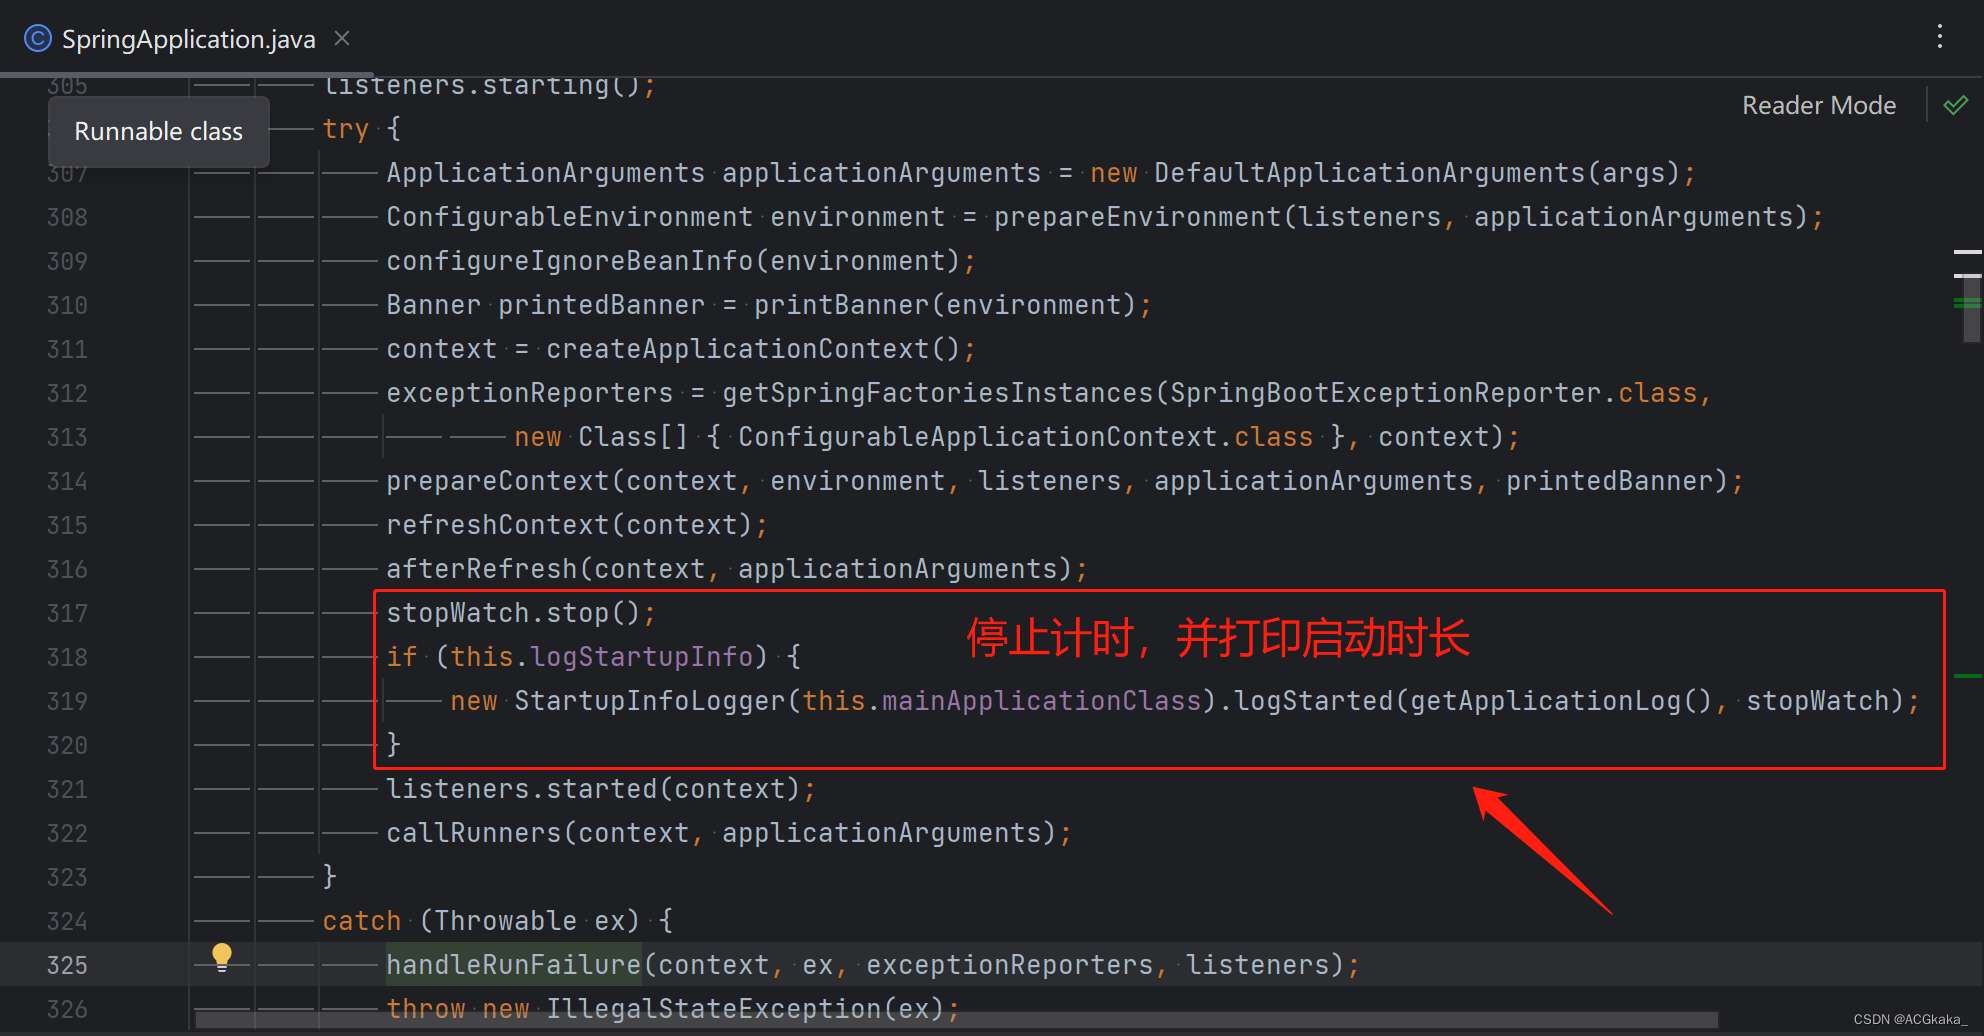
在控制台看到启动还是挺快的,2 秒多就启动完成了。
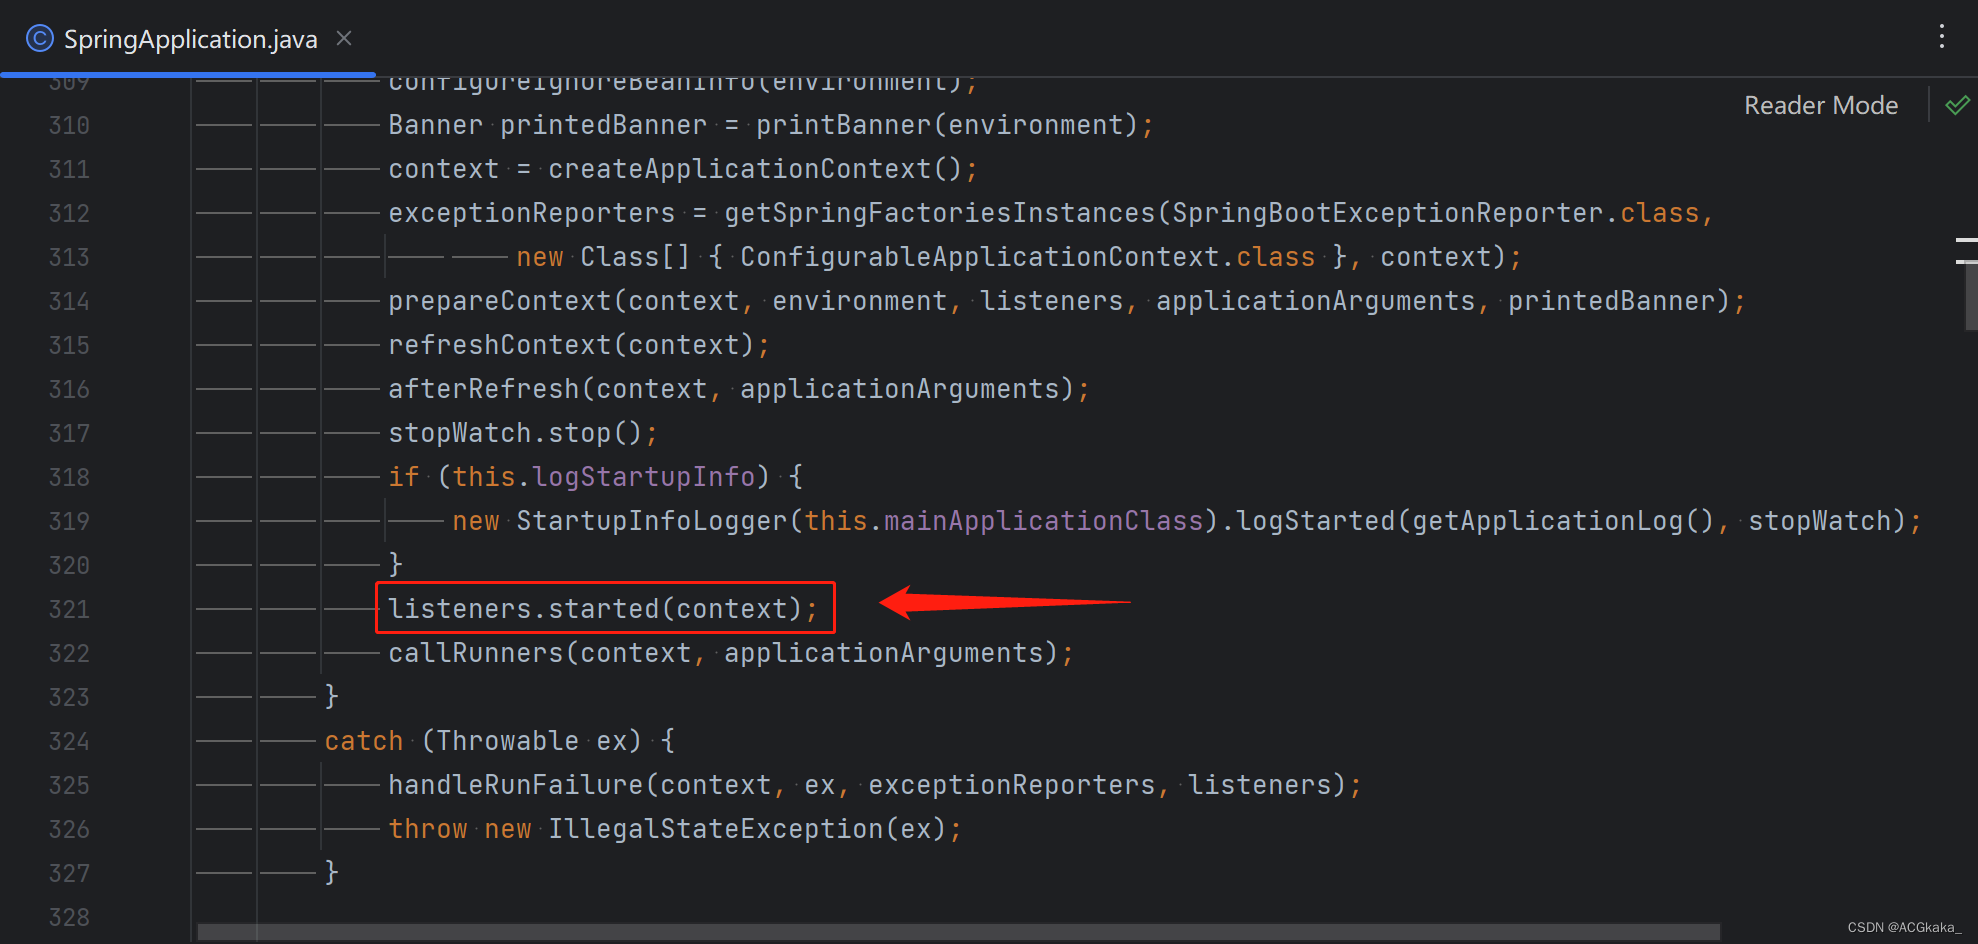
19、发布上下文准备就绪事件
告诉应用程序,我已经准备好了,可以开始工作了。
20、执行自定义的 run 方法
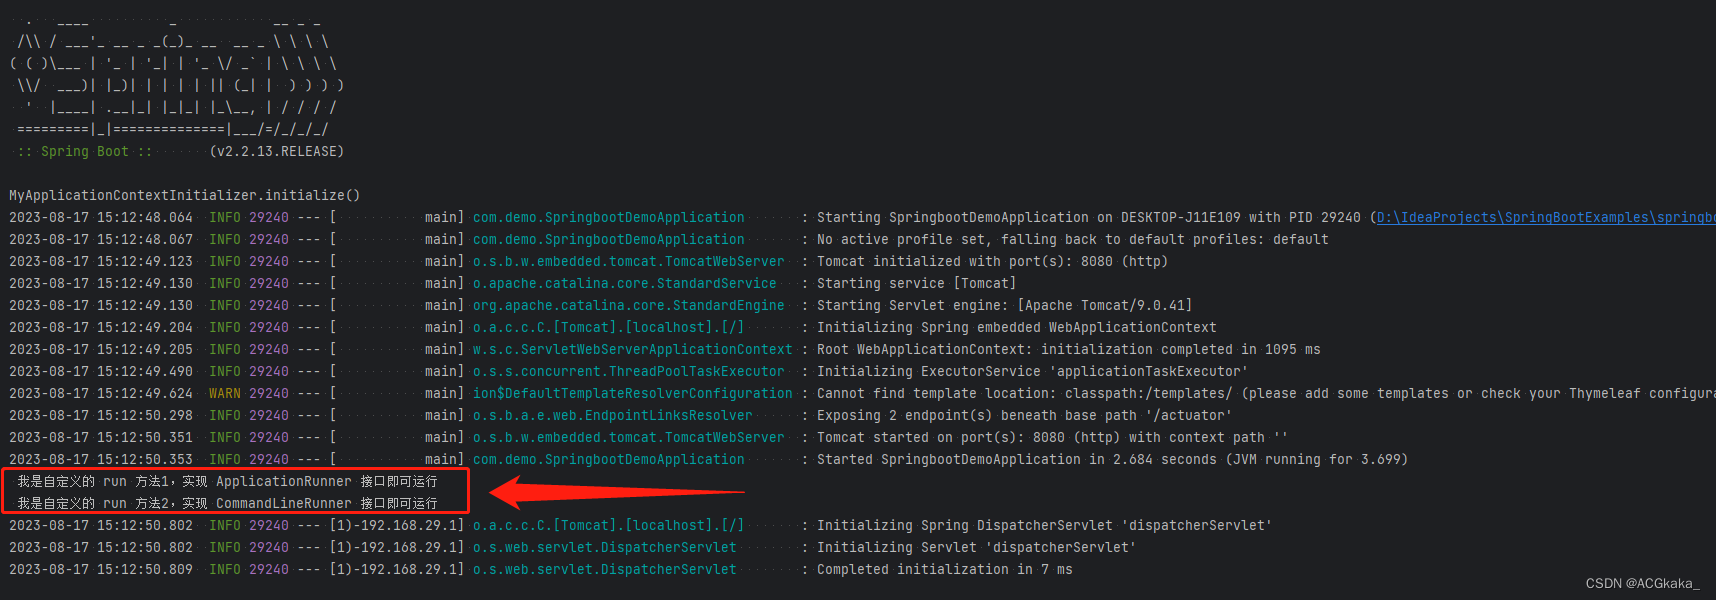
这是一个扩展功能,callRunners(context, applicationArguments) 可以在启动完成后执行自定义的 run 方法。有 2 种实现方式:
1、 实现ApplicationRunner接口;
2、 实现CommandLineRunner接口;
接下来我们验证一把,为了一次性验证全,我们把这 2 种方式都放在同一个类里面。
import org.springframework.boot.ApplicationArguments;
import org.springframework.boot.ApplicationRunner;
import org.springframework.boot.CommandLineRunner;
import org.springframework.stereotype.Component;

/**
 * 自定义启动后执行
 */
@Component
public class MyRunner implements ApplicationRunner, CommandLineRunner {


    @Override
    public void run(ApplicationArguments args) throws Exception {


        System.out.println(" 我是自定义的 run 方法1,实现 ApplicationRunner 接口即可运行");
    }

    @Override
    public void run(String... args) throws Exception {


        System.out.println(" 我是自定义的 run 方法2,实现 CommandLineRunner 接口即可运行");
    }
}
启动 SpringBoot 后就可以看到控制台打印的信息了。
整理完毕,完结撒花~ 🌻
参考地址:
1、 SpringBoot 启动过程,https://blog.csdn.net/qq_42259971/article/details/127151316;
2、 Spring 的 Bean 实例化原理,这一次彻底搞懂了!https://zhuanlan.zhihu.com/p/198087901;
